All in One View
Content from Part 1: Introduction to git and GitHub
Last updated on 2026-01-20 | Edit this page
Estimated time: 20 minutes
Overview
Questions
- What is git?
- A version control tool? What does that mean?
- How can version control help me?
- Are git and GitHub the same?
Objectives
- Understand what version control is and how git, as a version control tool, is useful
- Understand the difference between git and GitHub
- Demonstrate the basics of a git workflow and how git works with files
Introduction
This introductory part of the session is being delivered as a short “lecture-style” PowerPoint presentation.
If you would like to see some further introductory content, there are some useful introductory videos that you can watch in the git documentation:
Content from Part 2: Getting started with git
Last updated on 2026-01-20 | Edit this page
Estimated time: 30 minutes
Overview
Questions
- How do I manage some files with git?
- What are the most basic git commands?
- How do I use them?
- Why are we using the command line?!
Objectives
- Learn the basics of a simple git workflow, adding and committing files
- Try out and understand the core git commands that all git users need to know
Getting started with git
Why are we using the command line?
Git can be a complex tool to work with but if you understand it properly, it’s extremely powerful and can save you from losing files or help you recover when something breaks!
While there are now various graphical user interfaces for git, for example GitHub Desktop, or git integration with a wide range of text and code editors, these tools often obfuscate key elements of the git workflow and the tasks being carried out. We feel that learning the basics of git through its low-level command line interface offers the best route to properly understanding git.
Scenario - Technical lab manager
Imagine that you’re managing a fabrication lab. You have a number of differnet machines in the lab - several 3D printers of different models with different capabilities, laser cutters, and a couple of CNC milling machines.
Each of these machines has a computer controlling it and a number of different configuration files, templates, patterns and job files. These files change over time as new templates are added, configuration files are modified and different job tasks are required.
Git is a great way to manage these files and ensure that you retain a history of what changed when and the exact changes that were made. If this repository of files is shared between multiple lab staff, git will store details of who made the changes and when.
Once you’ve set up your repository, if you subsequently decide to host it on GitHub, colleagues (if you make the repository private and share it with individual colleagues), or anyone in the world (if you make the repository public), can see the files and potentially learn from your configurations and lab setup.
Let’s see how you might go about setting something like this up.
Set up a simple project directory and git repository
Note: We’ll be creating a few simple files in the
following sections. If you’d like to, you can download a small zip file
containing the “ready-made” directory structure with the files we’ll
create below. This will enable you to to skip some of the steps below
and make things a little faster. If you’d like to use this file, you can
download it here: git-technicians-files.zip.
(Save the file in your home directory and then extract it using the
unzip command on macOS or Linux, or File Explorer in
Windows.)
-
Open your shell/terminal, change into your home directory and create a project directory…
If you’re on Windows, ensure you open the Git Bash application which will open a bash shell (on of the standard Linux/Unix shells), rather than the Windows command prompt or PowerShell.
-
Create a simple file in this directory to start working with…
For this simple example, we’ll pretend we’re working with a 3D printer which needs a configuration file. That configuration file is going to be in YAML format.
You can edit the file in a text editor of your choice. If you’re not familiar with any basic command line text editors, many systems have
nanoavailable and this is a good choice. (nanoshould also be available in Git Bash on Windows).Paste the following content into the file (with thanks to GPT-5 which kindly generated this ultra-short, pseudo-realistic config file in YAML - note that this file does not represent a real configuration for any printer device and shouldn’t be used as such - all values are placeholders parameters are examples.)
printer: { model: "PrintExpert3D-400", kinematics: cartesian, bed: { x: 220, y: 220, z: 250 } }
motion: { vmax: 200, amax: 3000, z: { vmax: 12, amax: 80 } }
axes:
  x: { travel: [0,220], home: min }
  y: { travel: [0,220], home: min }
  z: { travel: [0,250], home: probe }
extruder: { nozzle: 0.4, filament: 1.75, temp_max: 260, min_extrude_temp: 170 }
bed: { temp_max: 120 }
probe: { offsets: [-30,-5,0] }
mesh: { area: { min: [20,20], max: [200,200] }, grid: [5,5] }
macros:
  start: "M140 S{bed|60}; M104 S{hotend|200}; G28; M190 S{bed|60}; M109 S{hotend|200}"
  end:   "G91; G1 E-2 Z10; G90; M104 S0; M140 S0; M106 S0"
notes: "Demonstration pseudo‑config file for training purposes; all values are placeholders."
If you’re not familiar with
nano, you can exit using Ctrl-x and you’ll be asked if you want to save the file. You can also save first by using Ctrl-o. If you’ve not made any further changes after saving, Ctrl-x will then exit straight away. -
Some quick one-time git setup
All git commits have a user name and email address associated with them. Before we do anything else, we’ll set this in your local git configuration on your system. This setting is specific to the git installation on this computer so if you go to another computer and install git, you’ll need to set the user name and email in the config there too…
BASH
$ git config --global user.email "<EMAIL ADDRESS TO USE FOR GIT COMMITS>"
$ git config --global user.name "<your first name and surname>"
For repositories that end up on public, web-based repositories such as GitHub, users often don’t want their email address publicly available on all commits that they make. GitHub provides the option to use a “no reply” email address based on your GitHub username. See the information they provide in the documentation on this for more details. Since we will be pushing this repository to GitHub shortly, you could initially use a noreply email address of the format GITHUB_USERNAME@users.noreply.github.com for the purpose of this example exercise, or simply include your regular email address.
-
Initialise a git repository in your
git-introdirectory.Here we’re telling git that we want to be able to use it to manage files within this directory (and all directories below this one - i.e. all subdirectories.)
You’ve learnt your first git command! If you run
ls -alnow, you should see a.gitdirectory present. This is what git created when you rangit init. So, we now have a directory with a file in it, and we’ve initialised a git repository in that directory. How do we tell git to actually do something useful?! -
The git workflow and checking the status of your repository
In a minute, we’re going to see the git workflow of staging and committing files in action. As highlighted in the introduction, this involves first adding all the files we want to store changes to into the “staging” area. Once all the changed files that we want to store in a given commit have been added to the staging area, we can then go ahead and commit the files.
In order to pick up changes to files, git needs to track files. It only tracks the files that we tell it to. The first time we add a file to the staging area that git has never seen before, it begins tracking the changes to that file.
At the moment, our repository is blank. We’ve created a repository in our
git-introdirectory, and there’s a file in our directory calledprinter-config.yaml, but we haven’t told git to track it. How can we confirm this? It’s time to look at the second git command we’re going to learn!git status- you can now run the command in your terminal:OUTPUT
On branch main

No commits yet

Untracked files:
  (use "git add <file>..." to include in what will be committed)
    printer-config.yaml

nothing added to commit but untracked files present (use "git add" to track)
There’s a lot of information in this output! However, you can also see that git’s output often provides helpful hints. Some key things to note:
No commits yet: That makes sense, we haven’t committed anything yet!Untracked files:Here git is highlighting that within this git repository, it can see a file that we haven’t told it to track. When working with more complex collections of files in a directory that is a set up as a git repository, it’s quite common that there are some files you won’t want git to track.-
On branch main: This one’s interesting - what is “branch main”?! Git has a concept of “branches”. Branches are really useful when you get into more advanced git use but, for now, it’s important to know that you can’t have a git repository without any branches. There will always be at least a default branch. That branch can actually be called anything but, by convention, it’s now generally calledmain. In the past it was calledmasterso you may still see older repositories where the default branch is calledmaster.Ok, we know that git can see our file that we created, and that it’s not yet tracking it. Let’s get our file tracked/staged and committed…
-
Committing our file to git
We’re now going to use the common pair of git commands
git addandgit committo create a new commit that stores our file to the git repository.git addis used to move files that we want to commit to the staging area, this has to be done before you can commit a file. In the case of new/untracked files,git addalso serves to mark that you want git to track the file. When you make a commit, you can add a comment with your commit. It’s really important that you add a short but descriptive comment with every commit. If you come back later and look at a repository with hundreds or thousands of commits and you want to find where you made a specific change or update, endless messages saying “Added file”, “Changed file” are really unhelpful!CalloutAdding comments to git commits
When you use the
git commitcommand, you can provide your comment directly on the command line using the-mswitch. If you don’t do this, git will open up the default text editor configured on your system for you to type in your comment. For the purpose of this simple example, we’ll use-mon the command line. You can tell git which editor on your system to open if you want to use that approach. A great reference for this is the configuration information in the Carpentries git lesson.We can now stage/track and commit our file:
BASH
$ git add printer-config.yaml $ git commit -m "Adding initial printer config" # no filename specified here, it adds all staged files.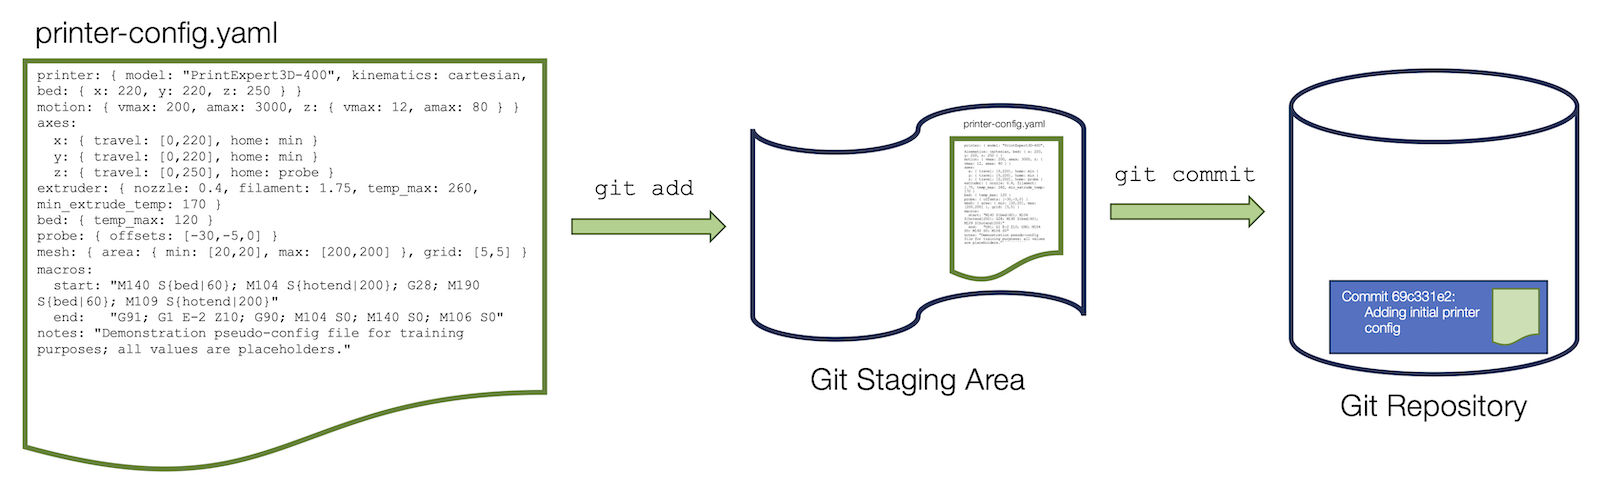 Illustration of the git staging and commit process.
Let’s use the status command we looked at before to see how things have changed:
OUTPUT
On branch main
nothing to commit, working tree clean
Ok, the file was committed, git is tracking it and nothing has changed since we made the commit (we only just did it!), so git tells us that there’s now nothing to commit and the working tree is clean (i.e. nothing has changed in the tracked files).
-
Looking at commit information
One last command for us to look at -
git log. This shows us details (a log) of all the commits in this repository:OUTPUT
commit 69c331e25240e170a57a19577389901bcbf066a2 (HEAD -> main) Author: Jeremy Cohen <jcohen02@users.noreply.github.com> Date: Fri Jan 16 00:55:35 2026 +0000 Adding initial printer config -
Let’s add a little more to our repository
Before we move on to look at GitHub, we’re going to add a “README” file and another sample data file to our repository.
This will help to show why the two-step process of staging can committing files is helpful.
We’re going to create a README file. This is a very common file to see in the top level of a git repository. It generally provides some details about the project the repository contains, or the files that are stored there. We’re going to use a format called Markdown for our README file. When we subsequently send our repository content to GitHub, one of the things GitHub does is looks for a README file in the top level of a repository and then displays it nicely on the main repository page in the GitHub web interface. Even if you’re not using GitHub, a README file is important to provide useful information to anyone using your project, or just to remind you what’s there when you come back after a while and look at the files!
Our README file will have a
.mdextension since it’s in Markdown format. Again, usingnano, or an editor of your choice, create a file named README.md and paste the contents below into it:Here’s the contents to put into the file:
# Git and GitHub for Technicians Example Repository This repository is a simple example created as part of the git and GitHub for technicians workshop session run as part of the Institute for Technical Skills and Strategy (ITSS) WinterFest event series. ### What files are here? The repo contains a mock top-level configuration file for a 3D printer setup and a directory (`job_configs`) for storing a set of standard job configurations used within our invented fabrication lab! ### Still to do There are a few tasks that still need to be done here: - Add a space for our lab SOPs and begin adding them - Create space for configurations for other instruments and machines in the lab - Restructure the files to put the 3D printing content in its own sub-directory alongside content for other lab machines. - ... ### Licence The content in this repository is under an open licence (CC-Y-4.0) in the hope that other lab managers will find it useful and take advantage of the structure here to manage their own open lab profiles, configurations and protocols.CalloutAdding a licence to your repository
It’s very important (especially if you’re making your repository public and hoping that it will be useful to others), that you include a licence on your repository. The licence is generally stored in a file called LICENSE. There are many open source licences available for code, documentation and other text-based content. This helps to ensure that people wanting to use your materials know what they’re allowed to do with them and who to acknowledge.
In view of the limited time available, we won’t add a licence now but you can simply create a file called LICENSE, paste the content of your chosen licence into it and then add it to your repository, or you can follow GitHub’s helpful licensing documentation, once we’ve added our repository to GitHub. If you create a repository within GitHub in the first place, GitHub’s licence picker helps you to add a licence when the repository is initially set up.
CalloutIgnoring files you don’t want to commit - .gitignore
Again, we don’t have time to cover this fully in the session but it’s often the case that there are files you don’t want to add to your git repository. Maybe local configuration files created by your text editor that are only relevant to your computer, or temporary files generated by a tool you’ve run to create some content in your repository for example.
If you have those files floating around in your repoaitory directory, every time you run
git status, git will remind you that those files exist and are untracked. It’s also rather easy to accidentally commit them later.As a result, you can create a file called
.gitignore(note the “.” at the start) and include a list of files or patterns (e.g.*.tmp) on individual lines. Git will then ignore any files in your directory that match that pattern and won’t tell you about them again.You can take a look at the .gitignore documentation for much more information.
To complete our simple test repository, we’ll now create a directory and put a placeholder file in there. We’ll then look at how to commit the new content.
Add the following content into
placeholder_config.txt:This is a placeholder file for the job_configs directory where job configurations for our most common 3D printing processes will be stored.Now let’s stage and commit the new files. Let’s first look at the output of
git status:OUTPUT
On branch main
Untracked files:
(use "git add <file>..." to include in what will be committed)
README.md
job_configs/

nothing added to commit but untracked files present (use "git add" to track)
What do you note here? We can see that there are untracked files but it looks a little different to what we saw in the previous example.
Here we’re going to commit two files (and a directory that one of the files is in). This shows the value of staging. We move all the files we want to commit into the staging area and then we can run
git commitonce, with a descriptive message, to commit everything that is in the staging area:BASH
$ git add README.md
$ git add job_configs

# (What do you note about the above command? Run `git status` to see what's happened.)

$ git commit -m "Adding a README and initial job_configs"
Note that you don’t have to commit all changed files in a single commit. You may sometimes want to stage a few files that represent once specific logical change to your repository, for example you’ve added a functional change to your configuration. You stage just those files and commit them.
git statuswill then show that any other files you didn’t commit remain in the repository with their changes but these changes haven’t yet been stored to the git repository.Let’s check the output of
git statusand see where we are now with the status of our repository…OUTPUT
On branch main
nothing to commit, working tree clean
And now, let’s look at the commit log:
OUTPUT
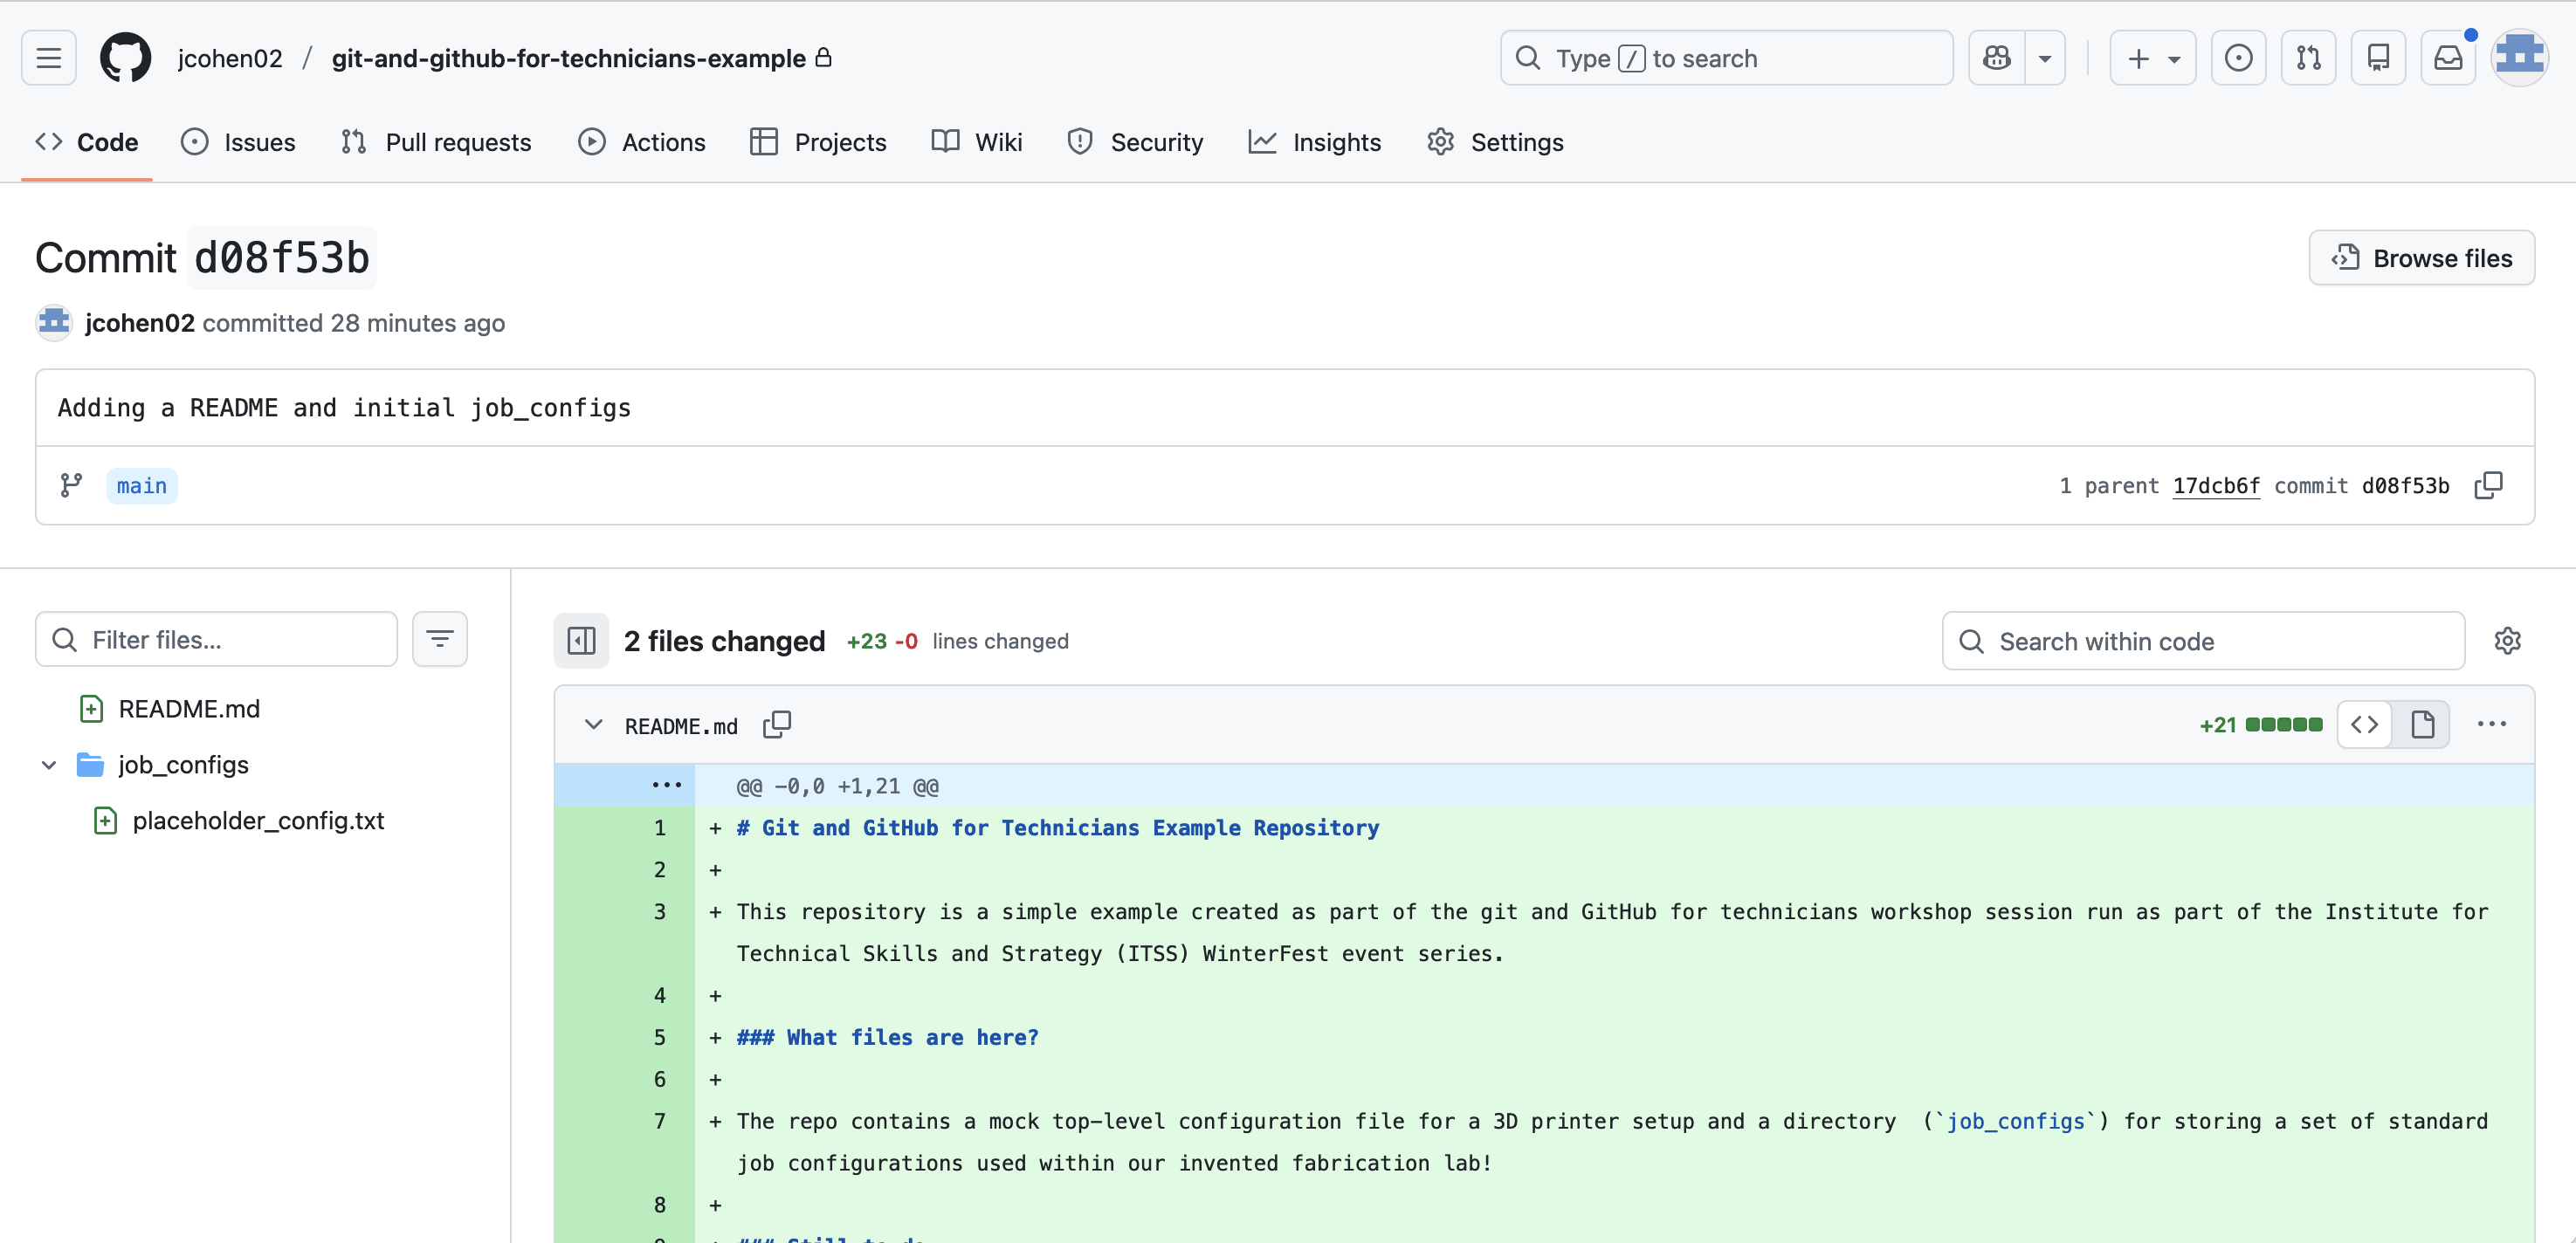
commit d08f53b9d03edb7199bfcd0019fdcd76cbd2eba8 (HEAD -> main) Author: Jeremy Cohen <jcohen02@users.noreply.github.com> Date: Mon Jan 19 23:34:06 2026 +0000 Adding a README and initial job_configs commit 69c331e25240e170a57a19577389901bcbf066a2 (HEAD -> main) Author: Jeremy Cohen <jcohen02@users.noreply.github.com> Date: Fri Jan 16 00:55:35 2026 +0000 Adding initial printer config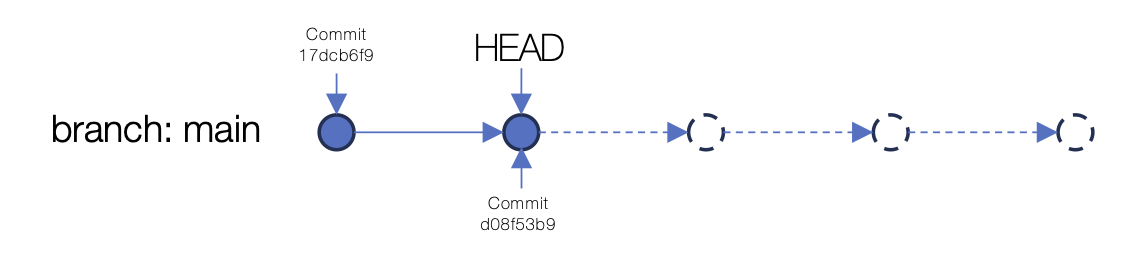 An illustration of the commit status after two commits.
We’ve now got a basic git repository with a couple of commits.
It’s on our local computer, which is fine, but if we want to work as part of a team with other people who would also like access to this information, what can we do? Well, we could simply copy the folder (including the
.gitfolder inside it, which contains all the git “magic”), onto a USB stick and share it with other people. However, if they make changes to files on their computer (and commit them) and we make changes, our two repositories diverge down different routes. This will get complicated and confusing quickly! There are far better options. One service that can help us is GitHub!We’re now going to look at how to “push” our local repository to a remote repository on GitHub.
Content from Part 3: Getting started with GitHub
Last updated on 2026-01-20 | Edit this page
Estimated time: 30 minutes
Overview
Questions
- How do I use GitHub?!
- How can I add my files to a GitHub repository?
- What are the benfits of using GitHub?
Objectives
- Get set up with an access token to be able to upload files to GitHub.
- Create a GitHub repository and upload your local repository to it.
- View commits and changes within GitHub.
Getting started with GitHub
Begin by going to https://github.com and signing in to your account.
We’re now going to create a personal access token so that you can authenticate with GitHub on the command line.
It’s important to note that Personal Access Tokens are NOT the recommended way of authenticating with GitHub when using it for everyday use. We’re using this approach here due to time constraints. For proper GitHub use, you should set up an SSH keypair and use SSH-based authentication to GitHub. There’s lots of information on this in the GitHub documentation and another great reference is the material in the Carpentries git lesson on SSH setup.
Setting up an access token
-
Go to your GitHub homepage (https://github.com), click your user icon at the top right of the page and select “Settings”.
 Location of the GitHub user menu where Settings is located.
 -
At the bottom of the Settings menu, select “Developer settings”.
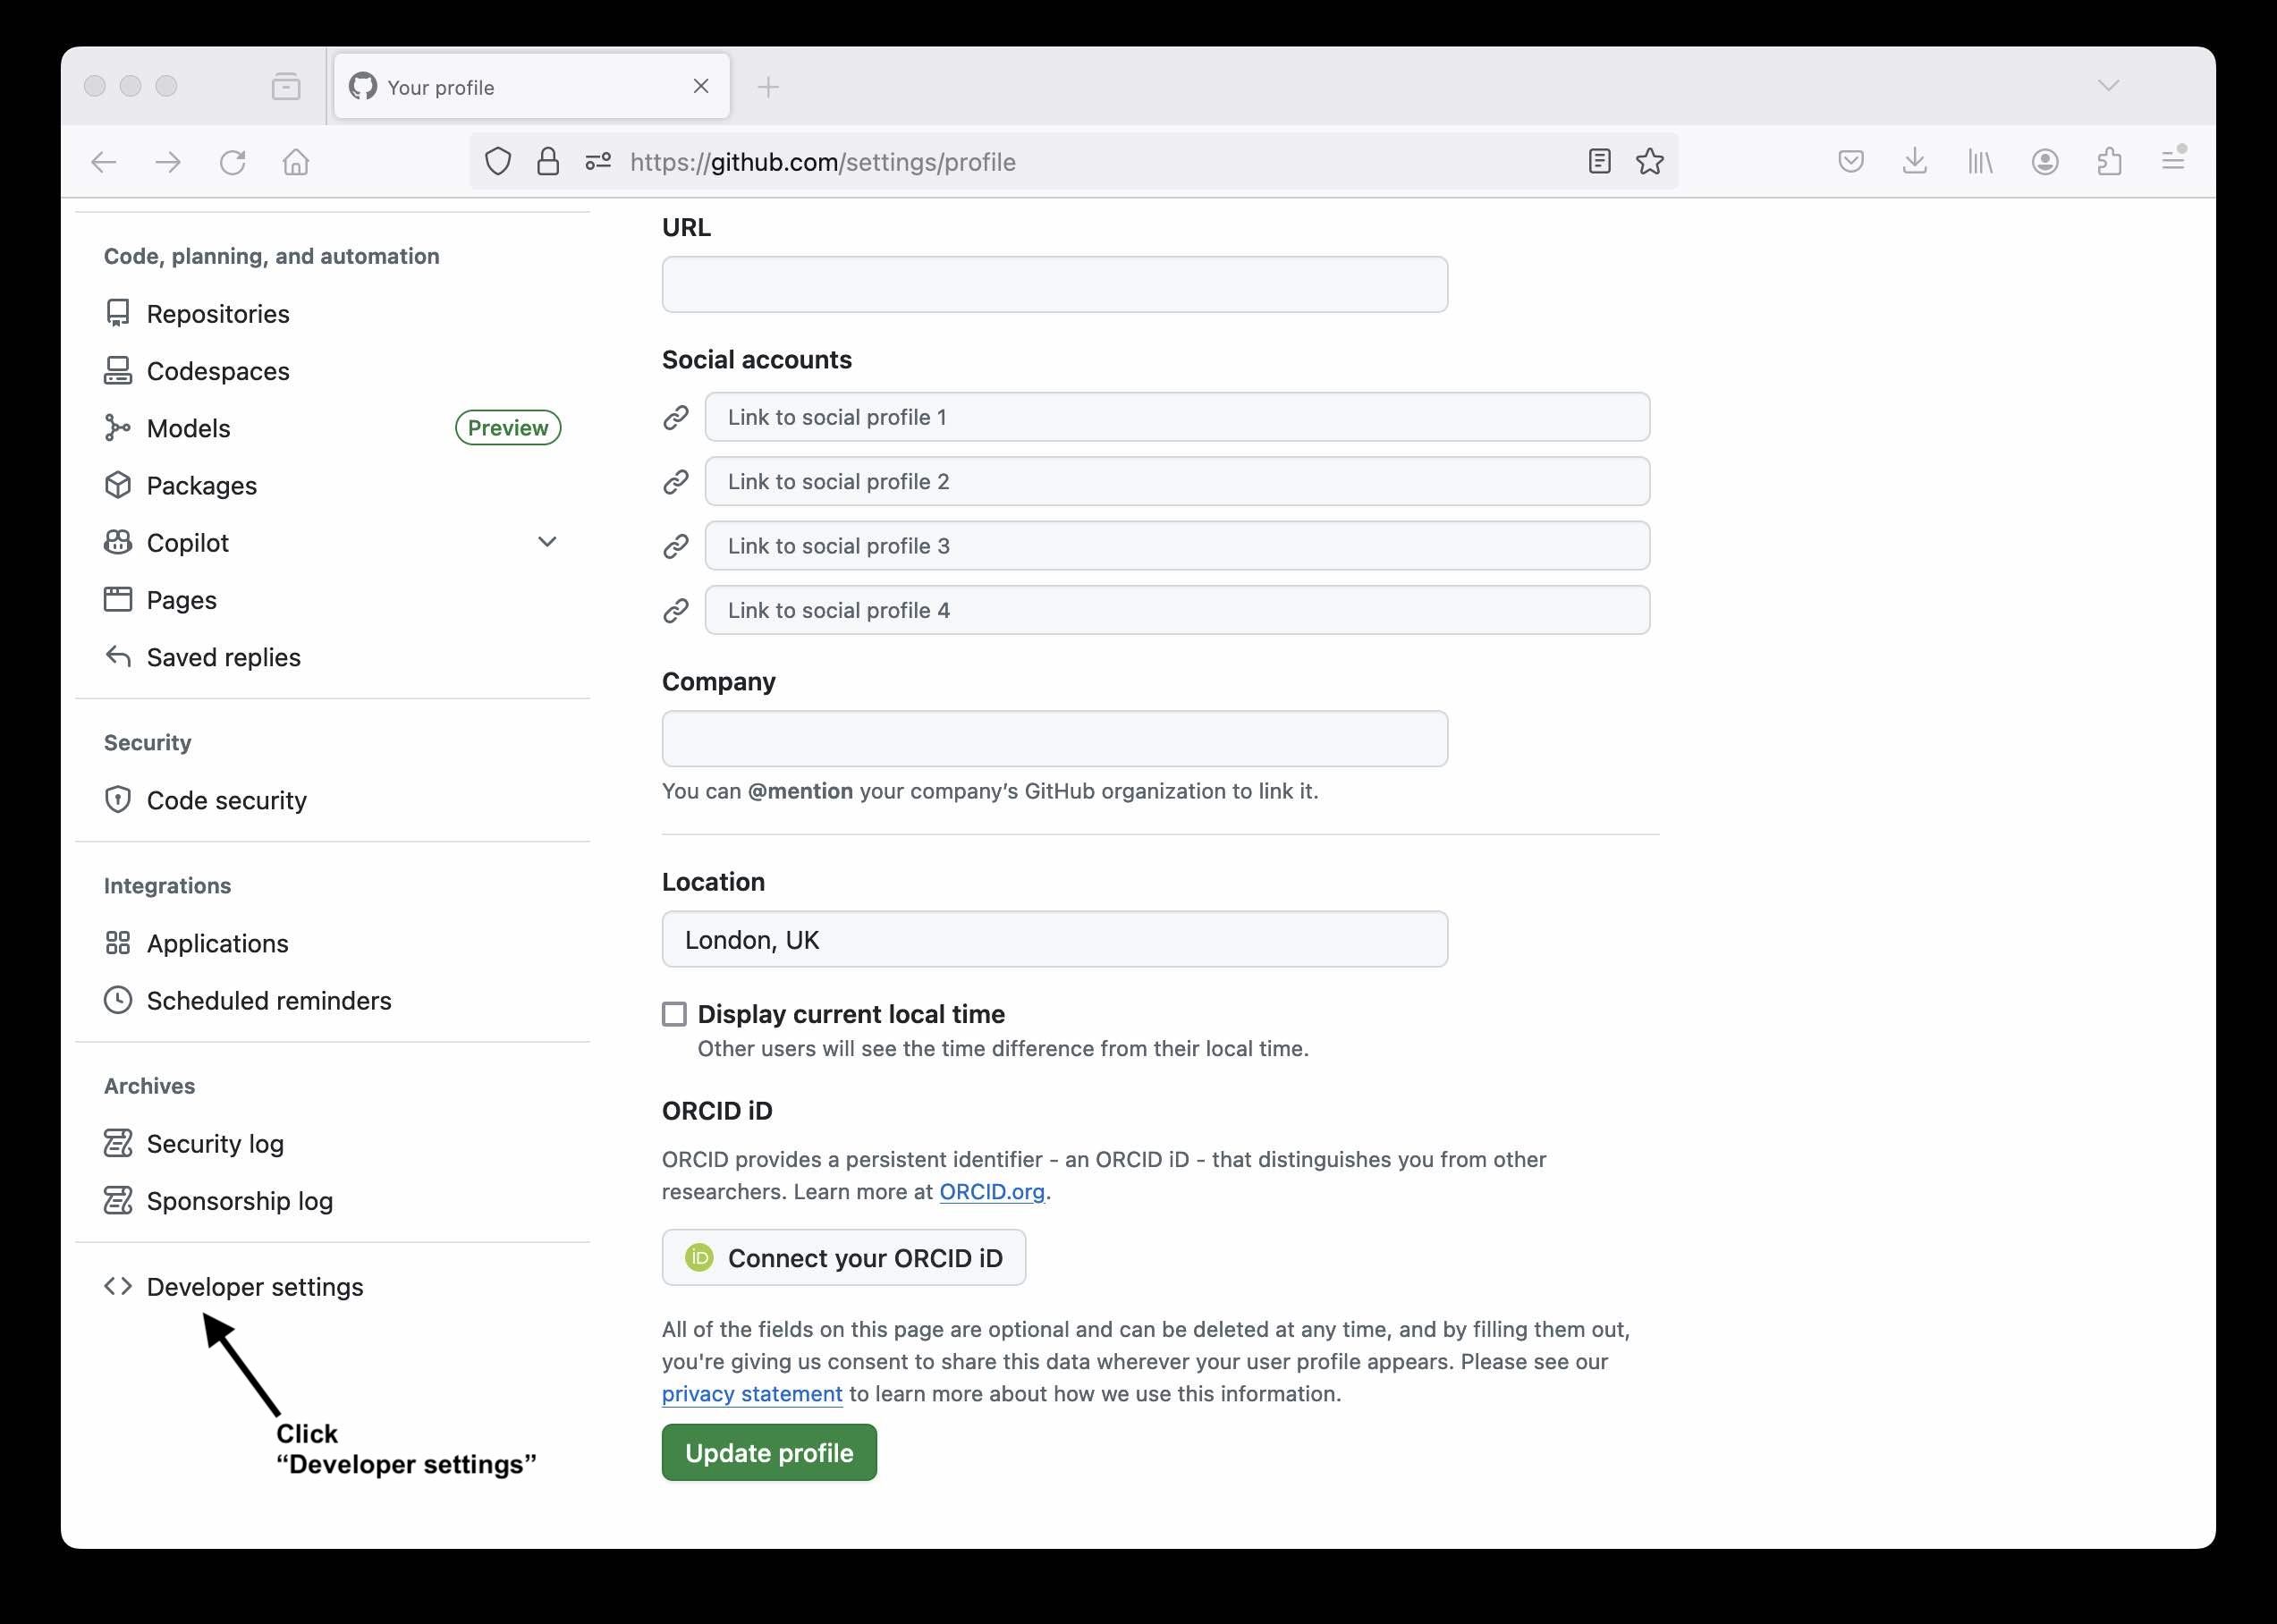 Location of the “Developer settings” option on the GitHub Settings page.
 -
Now expand the “Personal access tokens” option on the menu on the left, select “Tokens (classic)” and then towards the right-hand side of the page, click “Generate new token” and then the “Generate new token (classic)” option.
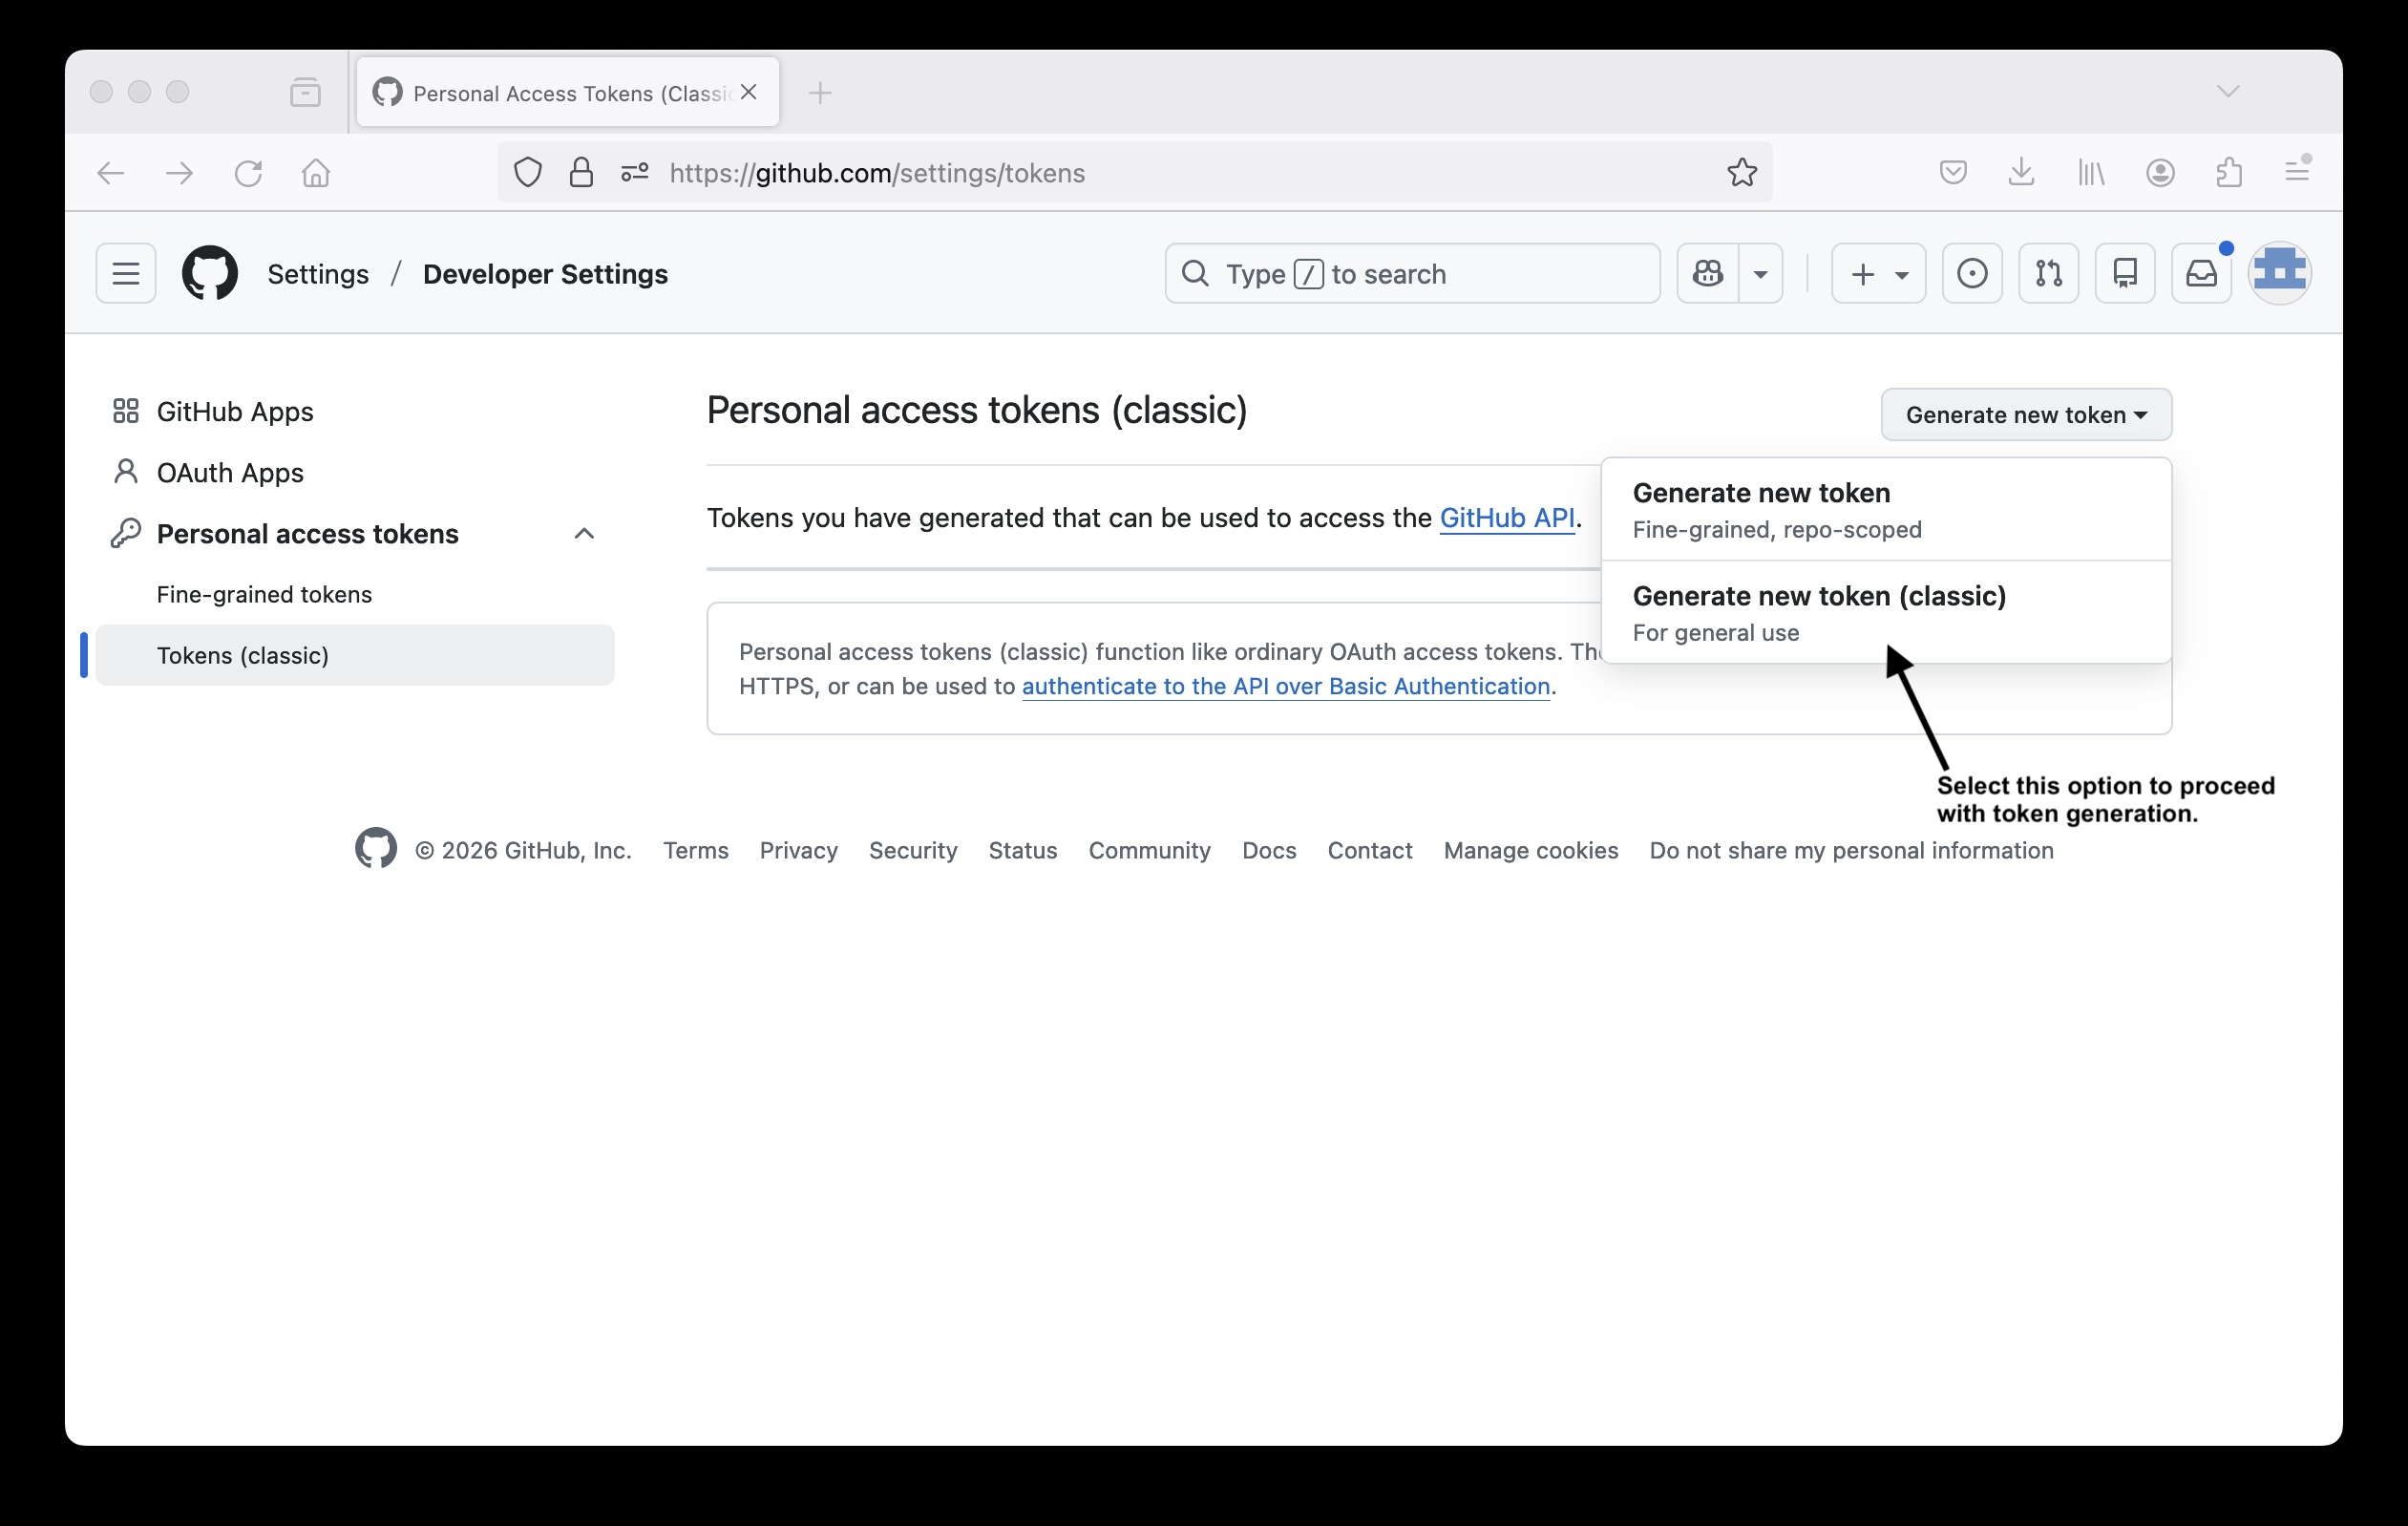 Location of the “Generate new token (classic)” option on the GitHub personal access tokens setup page.
 -
Add a name/purpose for your token. Set the expiry to 7 days and select the top level “repo” option under “Select scopes”. You can then scroll to the bottom and click “Generate token”.
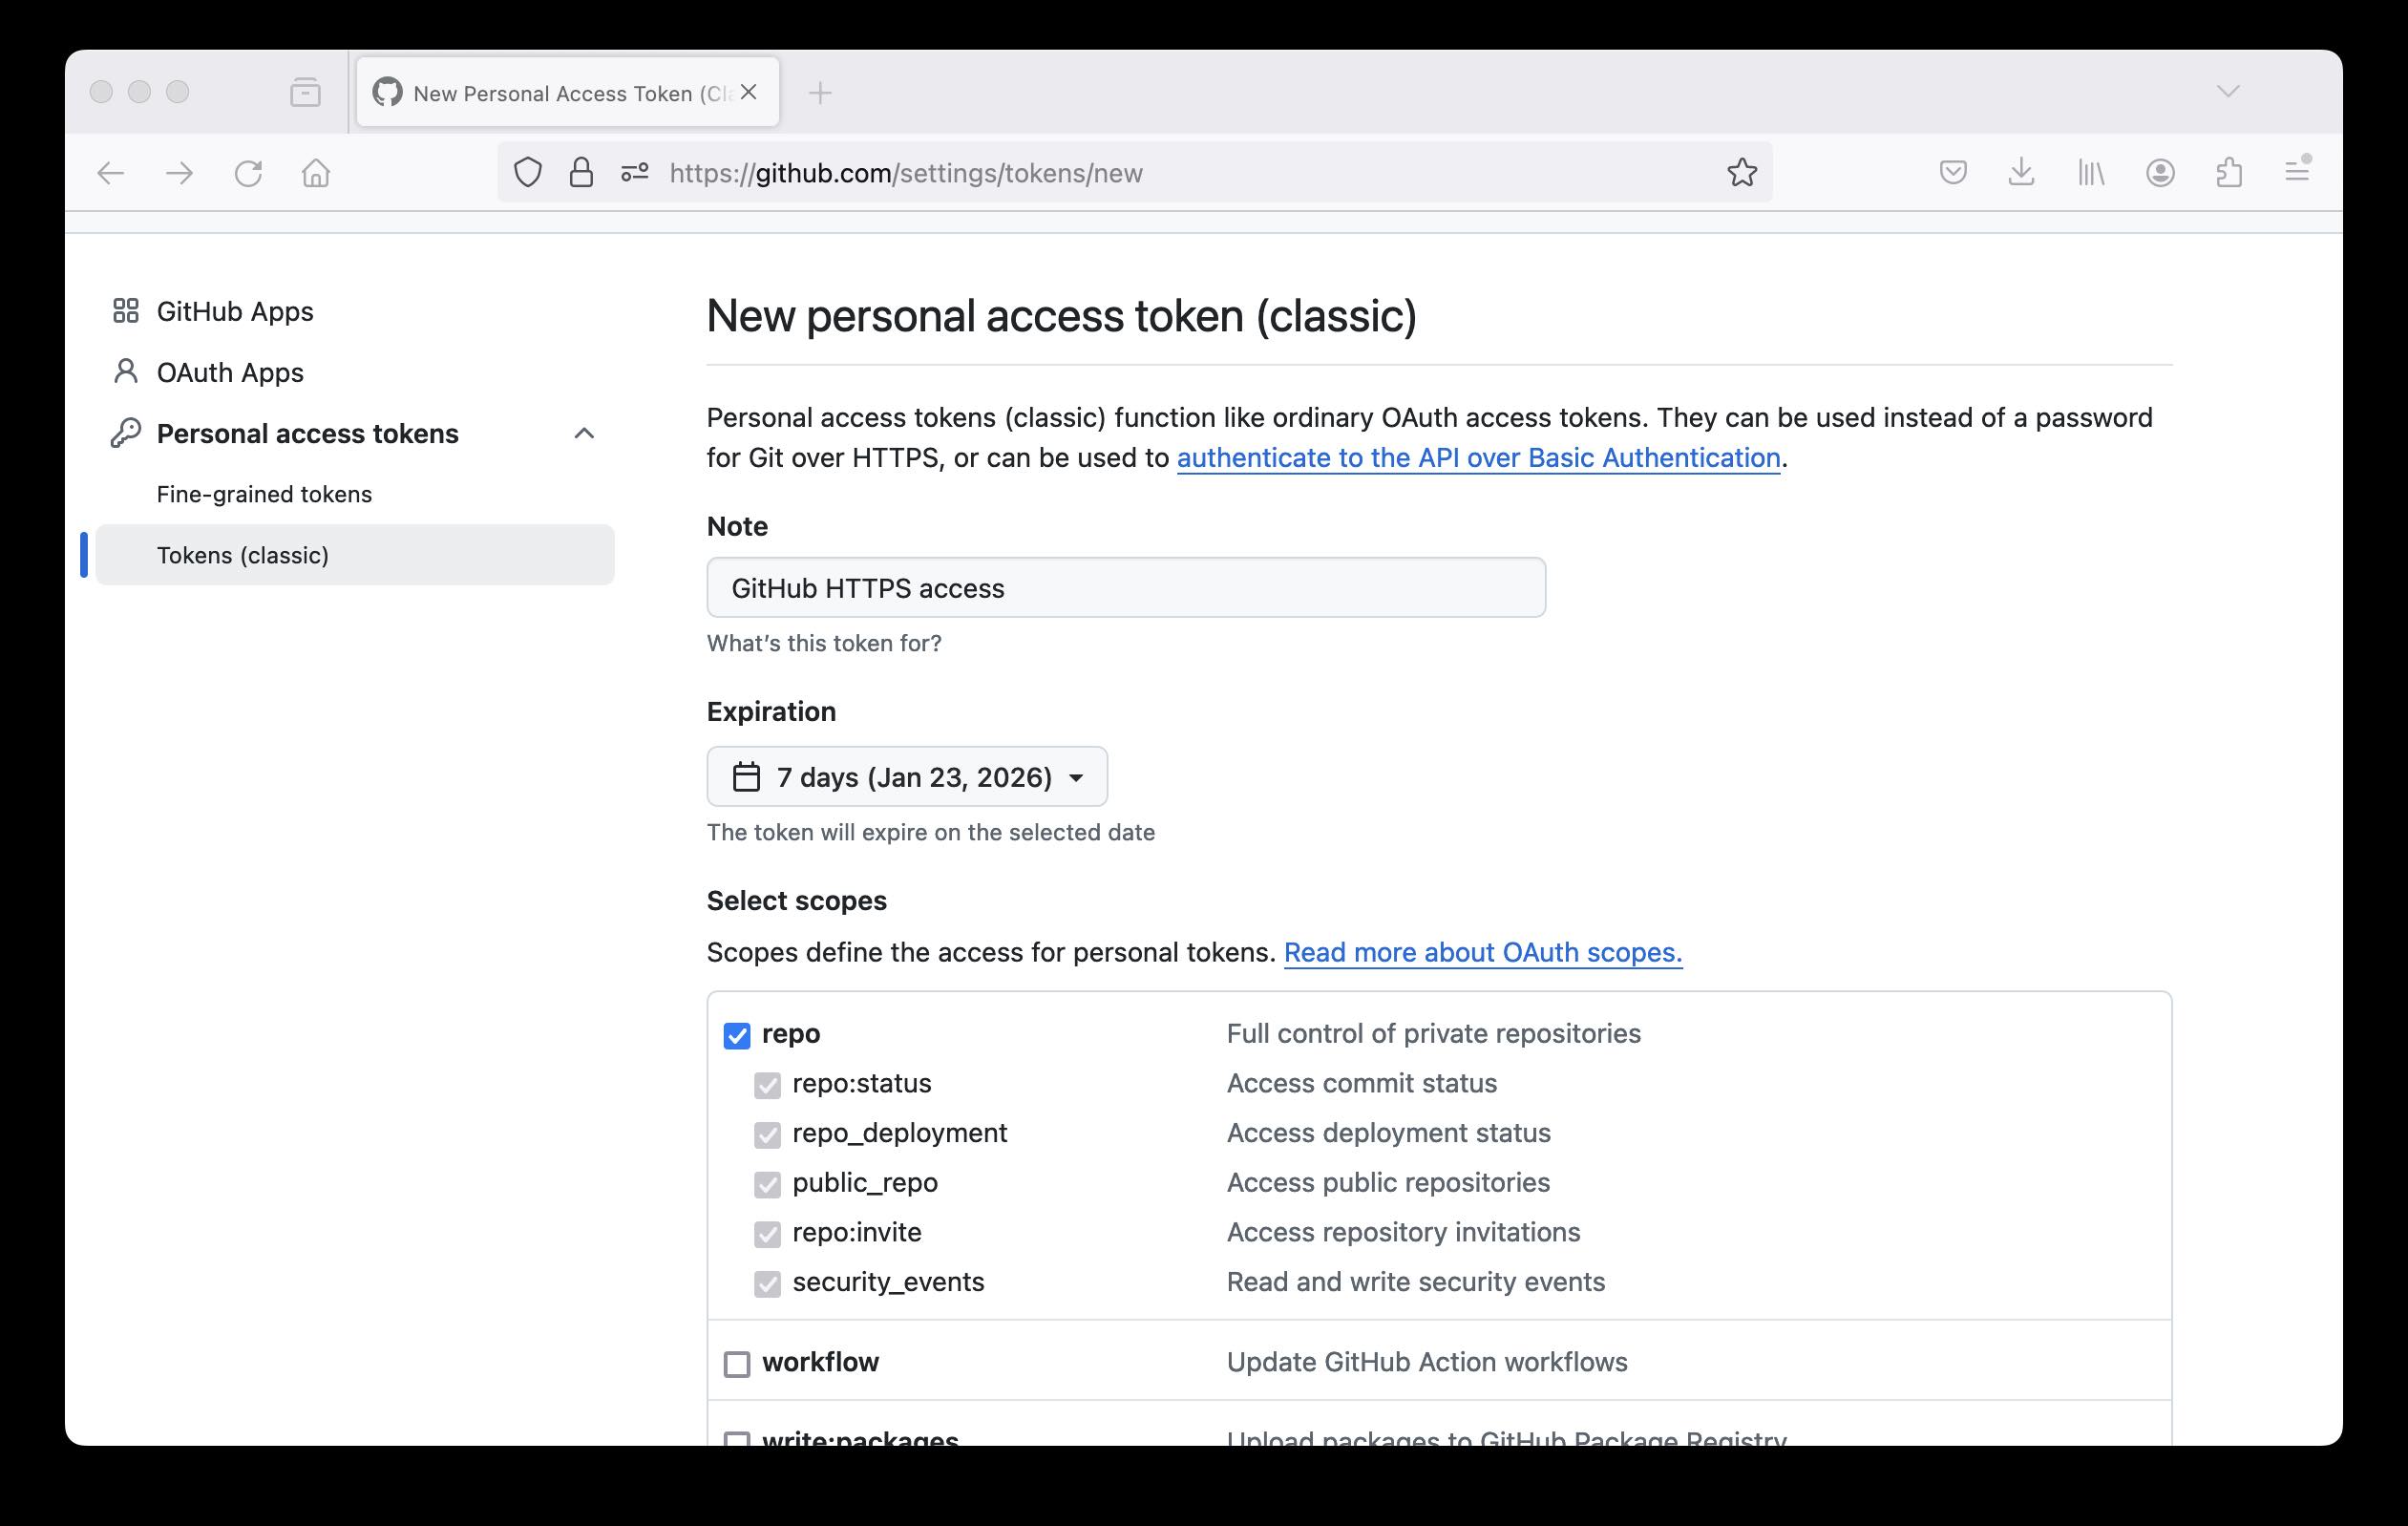 Screenshot showing personal access token configuration options.
 -
Your new token should be displayed. This will be your password for accessing GitHub from the command line. Store it in a secure location. YOU WILL NOT BE ABLE TO VIEW THIS TOKEN AGAIN.
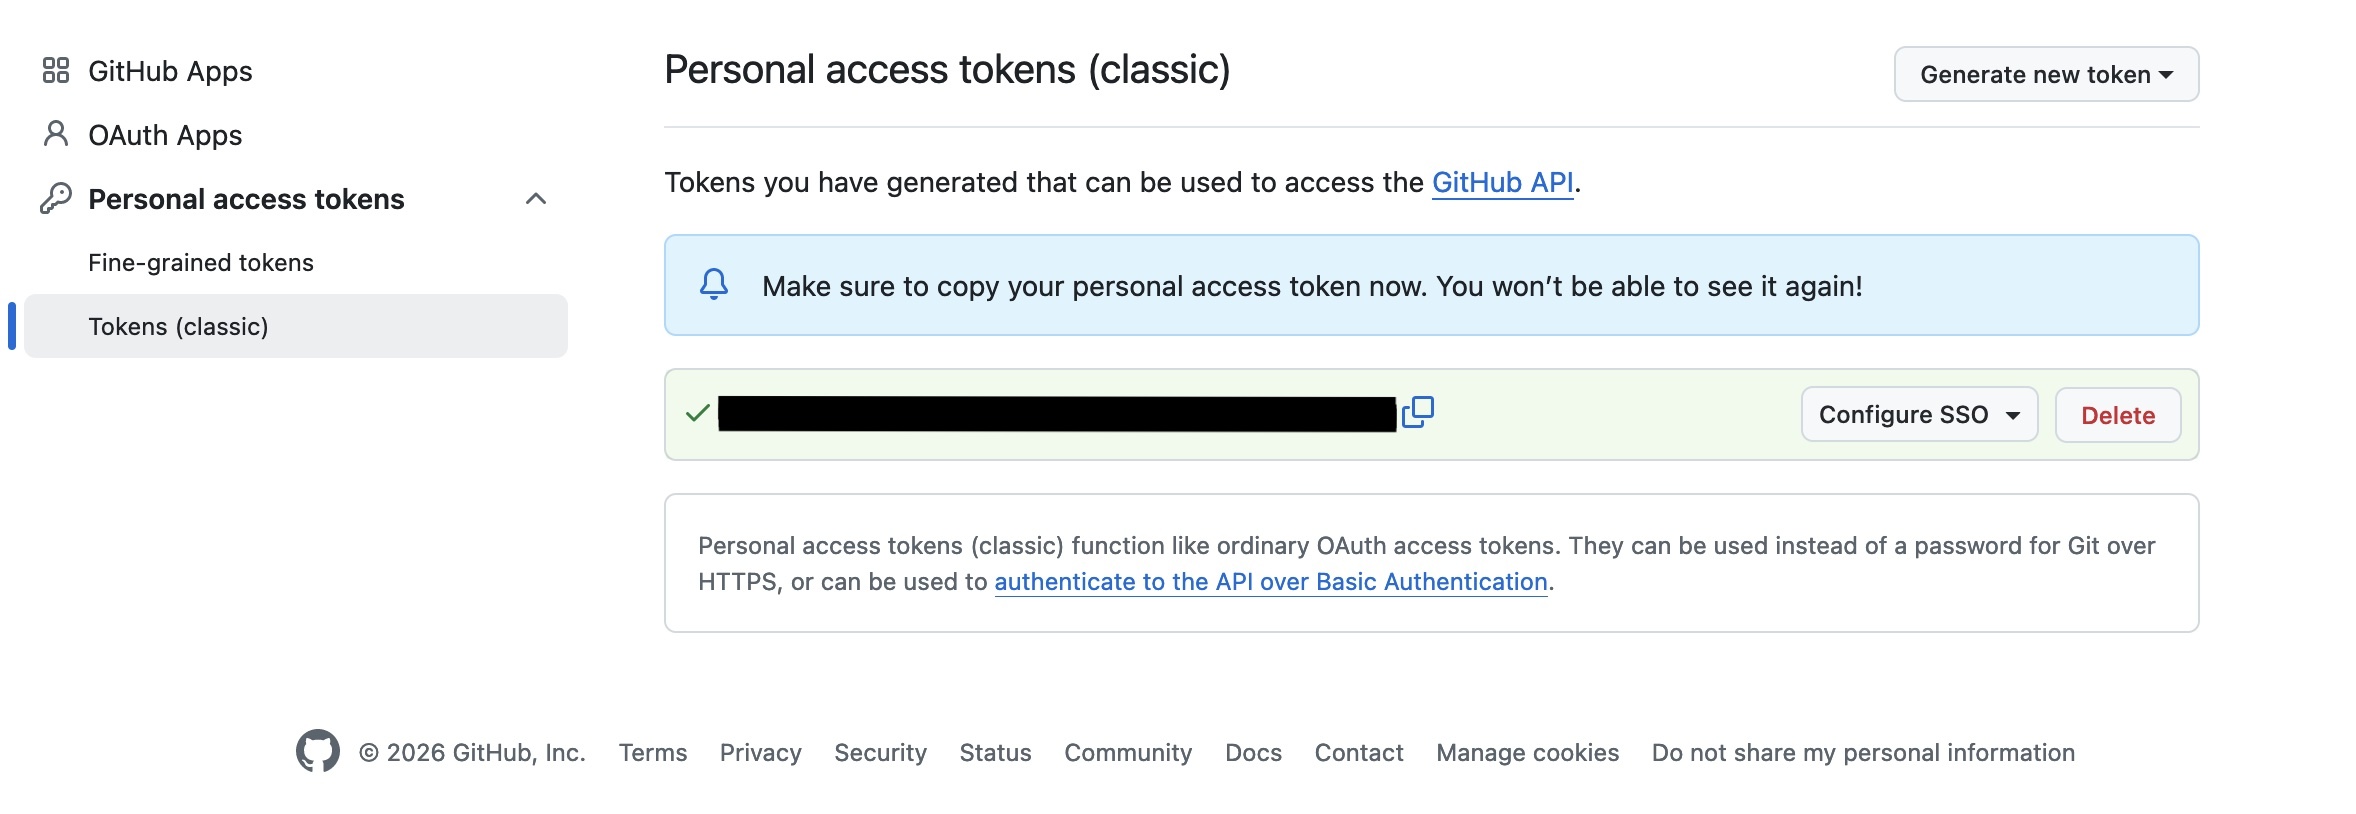 Screenshot showing generated access token.
Create a GitHub repository
We’ll now create a repository in GitHub that we can link to the local repository that you created on your computer a short while ago.
We can than synchronise the content of your local repository on your computer with the version on GitHub.
The version on GitHub acts like a cloud-based backup of your local content but, more importantly, it provides a remote copy of your repository content that you can share with collaborators who can work with you on updating/contributing to the content.
-
Select the “New repository” option under the “+” menu in the top bar of the GitHub page.
 Location of the “New repository” option on the GitHub web interface.
 -
Add some details to create your new repository on GitHub. Call your repository “git-and-github-for-technicians” (or you can use a different name if you prefer). If you see “Choose an owner” option to the left of the “Repository name” box, click it and select your GitHub username. However, this may be pre-populated with your username.
You can choose whether you want to make your repository public or private. If it’s public, it will be publicly visible to everyone on GitHub. If it’s private, then it will initially only be accessible by you but you can add other GitHub users as collaborators who will be able to view and edit the content in your repository (if you give them the permissions to do so).
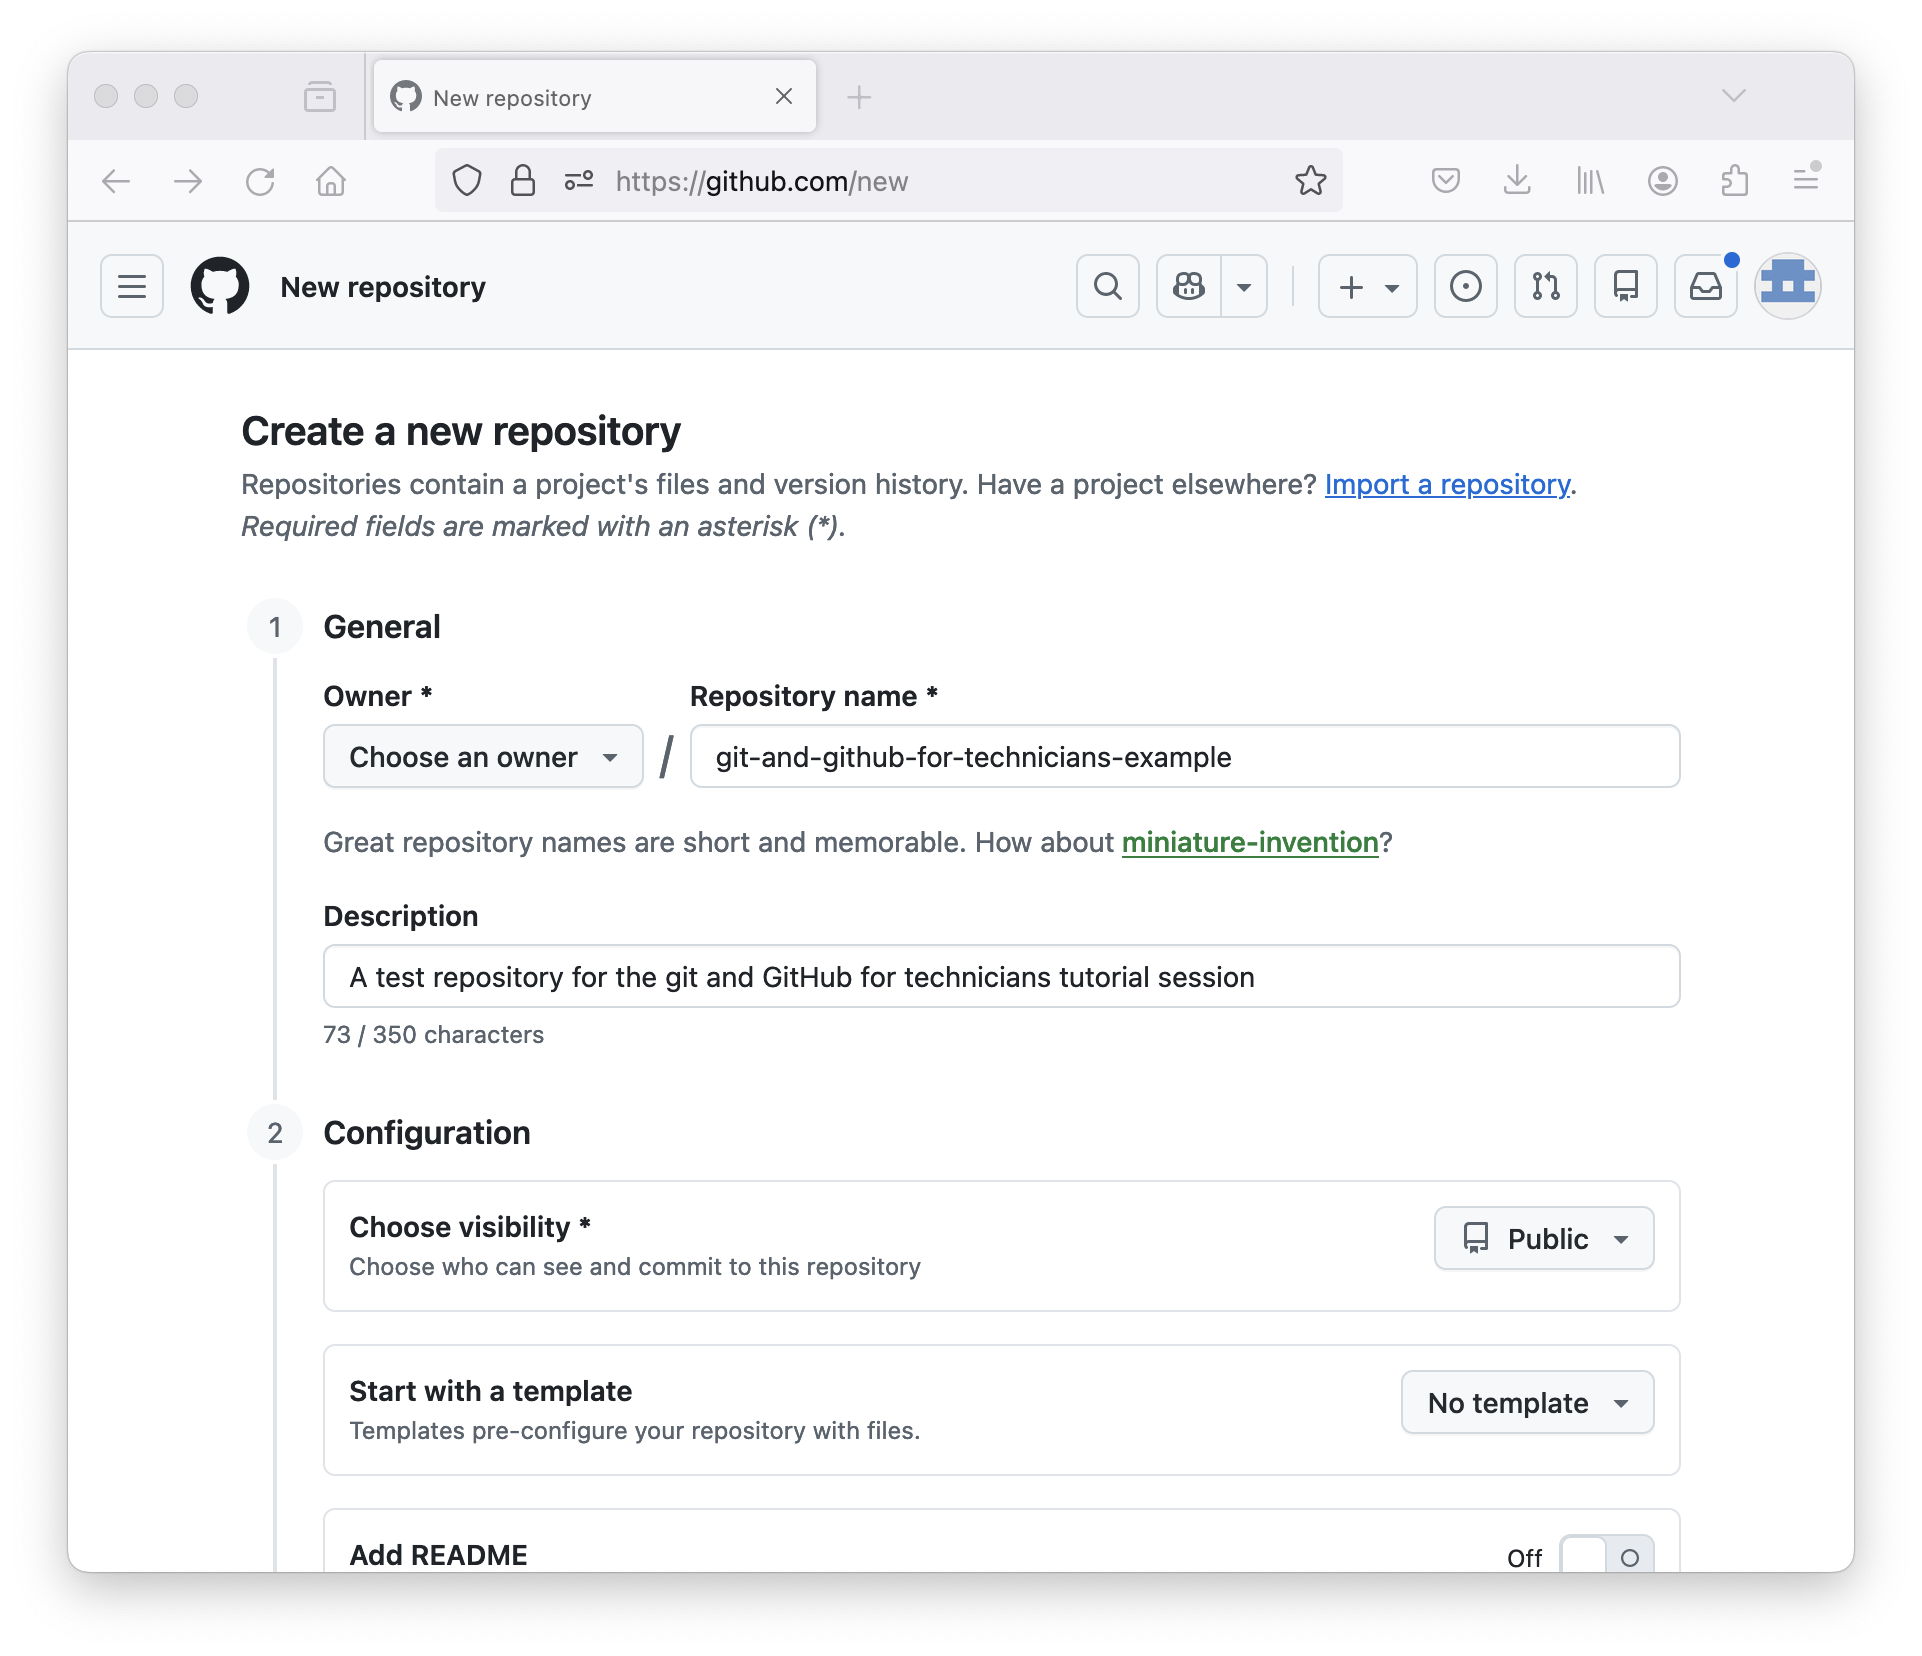 Screenshot showing options to select for creating a new repository in GitHub.
 -
Your repository is now created and GitHub provides some helpful information on how to proceed to get some content into your repository. Make sure you’re looking at the HTTPS option.
We already created a repository locally a short while ago so we’re going to “push” that repository from our local computer to this new repository we created in GitHub, using something similar to the example shown in GitHub to “push an existing repository from the command line”.
Push our repository from our local computer to GitHub
Back in your shell on your computer, make sure you’re in the
git-intro directory. We’re going to set up something called
a remote - a remote location that your repository is linked to. You can
have multiple remotes. This is one of the key aspects of the
“distributed” nature of git. There are some reasons why you might want
to do this but the details are out of scope in this quick intro.
Let’s add the repository we created in GitHub as a remote on our local repository:
BASH
$ git remote add origin https://github.com/[YOUR GITHUB USERNAME]/git-and-github-for-technicians-example.git
$ git remote -v       # This will show details of remotes you've set up
OUTPUT
origin	https://github.com/[USERNAME]/git-and-github-for-technicians-example.git (fetch)
origin	https://github.com/[USERNAME]/git-and-github-for-technicians-example.git (push)
Note the origin on the left hand side. Each git “remote”
has a name. This is important because if you have multiple remotes, so
that you can synchronise your code with different remote repository
locations, you need to know which one you’re synchronising with.
“origin” is the default name for the main remote for a repository. It’s
a convention and it’s simply a string, you could call it anything (and
it can be renamed) but “origin” is used by default.
We’re now going to “push” our local repository to GitHub. What does this mean?
- All the content of our local repository will be sent to GitHub.
- This includes the current version of the files and all the history - the changes that were made over time.
When prompted for your username, enter your GitHub username. For the password, enter the access token you created a short while ago. You should see output similar to the following. If this worked, your repository is now in GitHub.
OUTPUT
Username for 'https://github.com': [YOUR_USERNAME]
Password for 'https://[YOUR_USERNAME]@github.com':

Enumerating objects: 3, done.
Counting objects: 100% (3/3), done.
Delta compression using up to 12 threads
Compressing objects: 100% (2/2), done.
Writing objects: 100% (3/3), 664 bytes | 664.00 KiB/s, done.
Total 3 (delta 0), reused 0 (delta 0), pack-reused 0
To https://github.com/[YOUR_USERNAME]/git-and-github-for-technicians-example.git
 * [new branch]      main -> main
Exploring our repository in GitHub
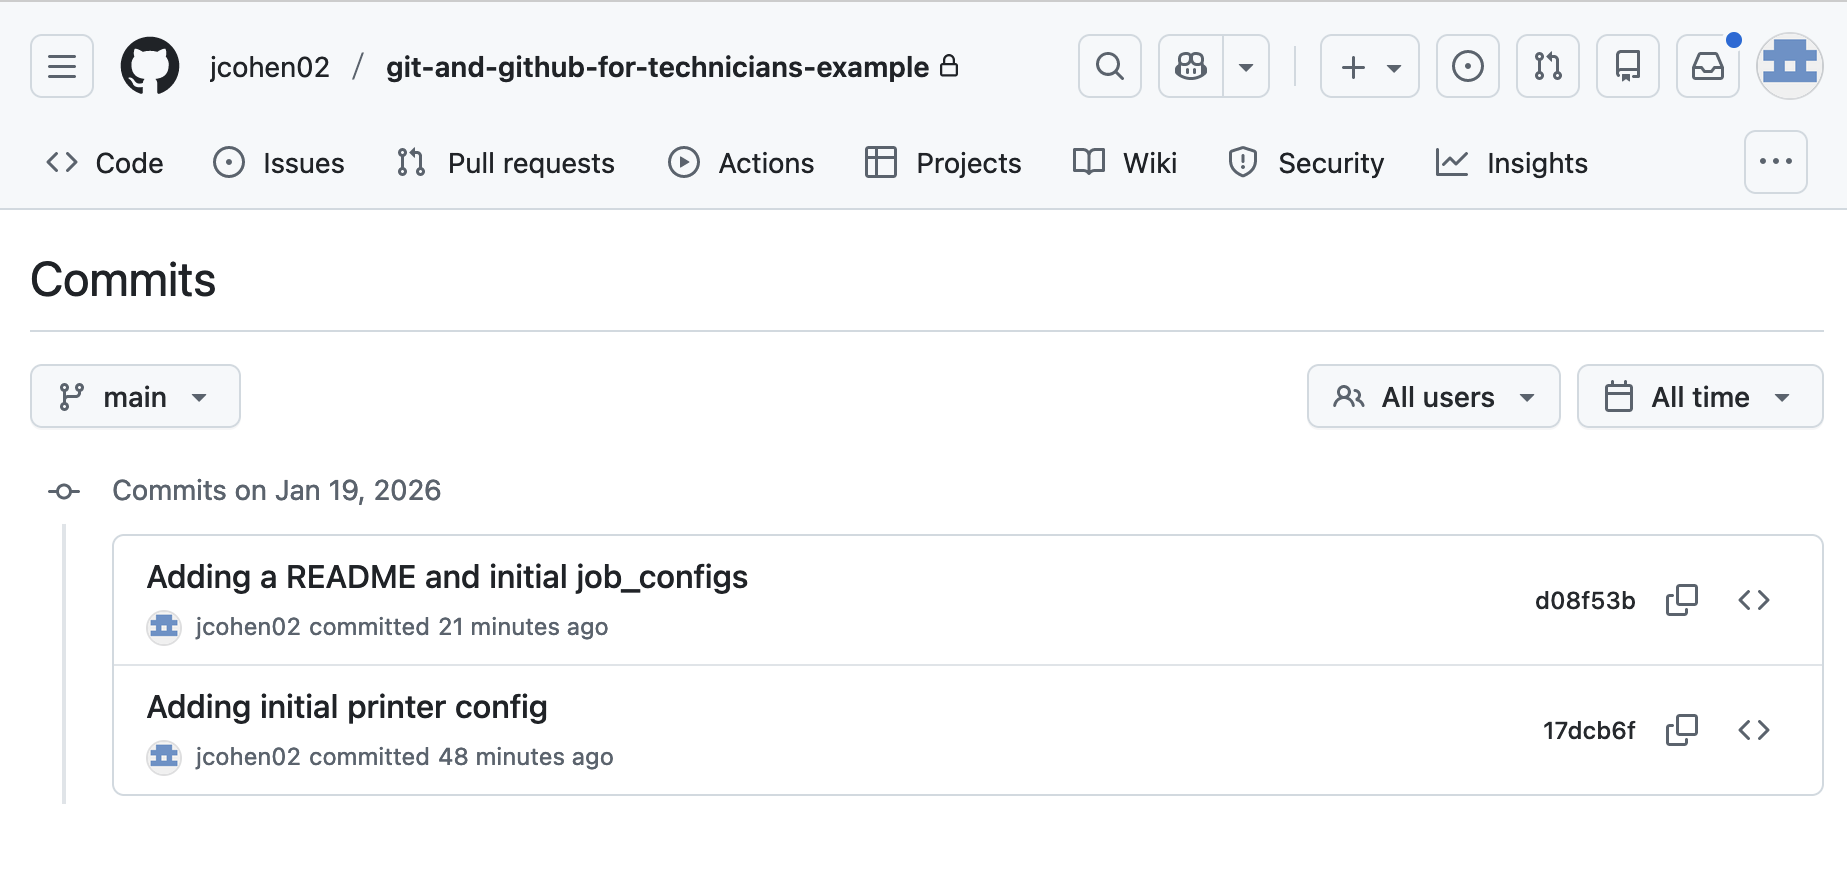
We can now go back to our repository page in GitHub and explore the content there. As you’ll see, it provides a much more user-friendly interface for browsing your repository content.
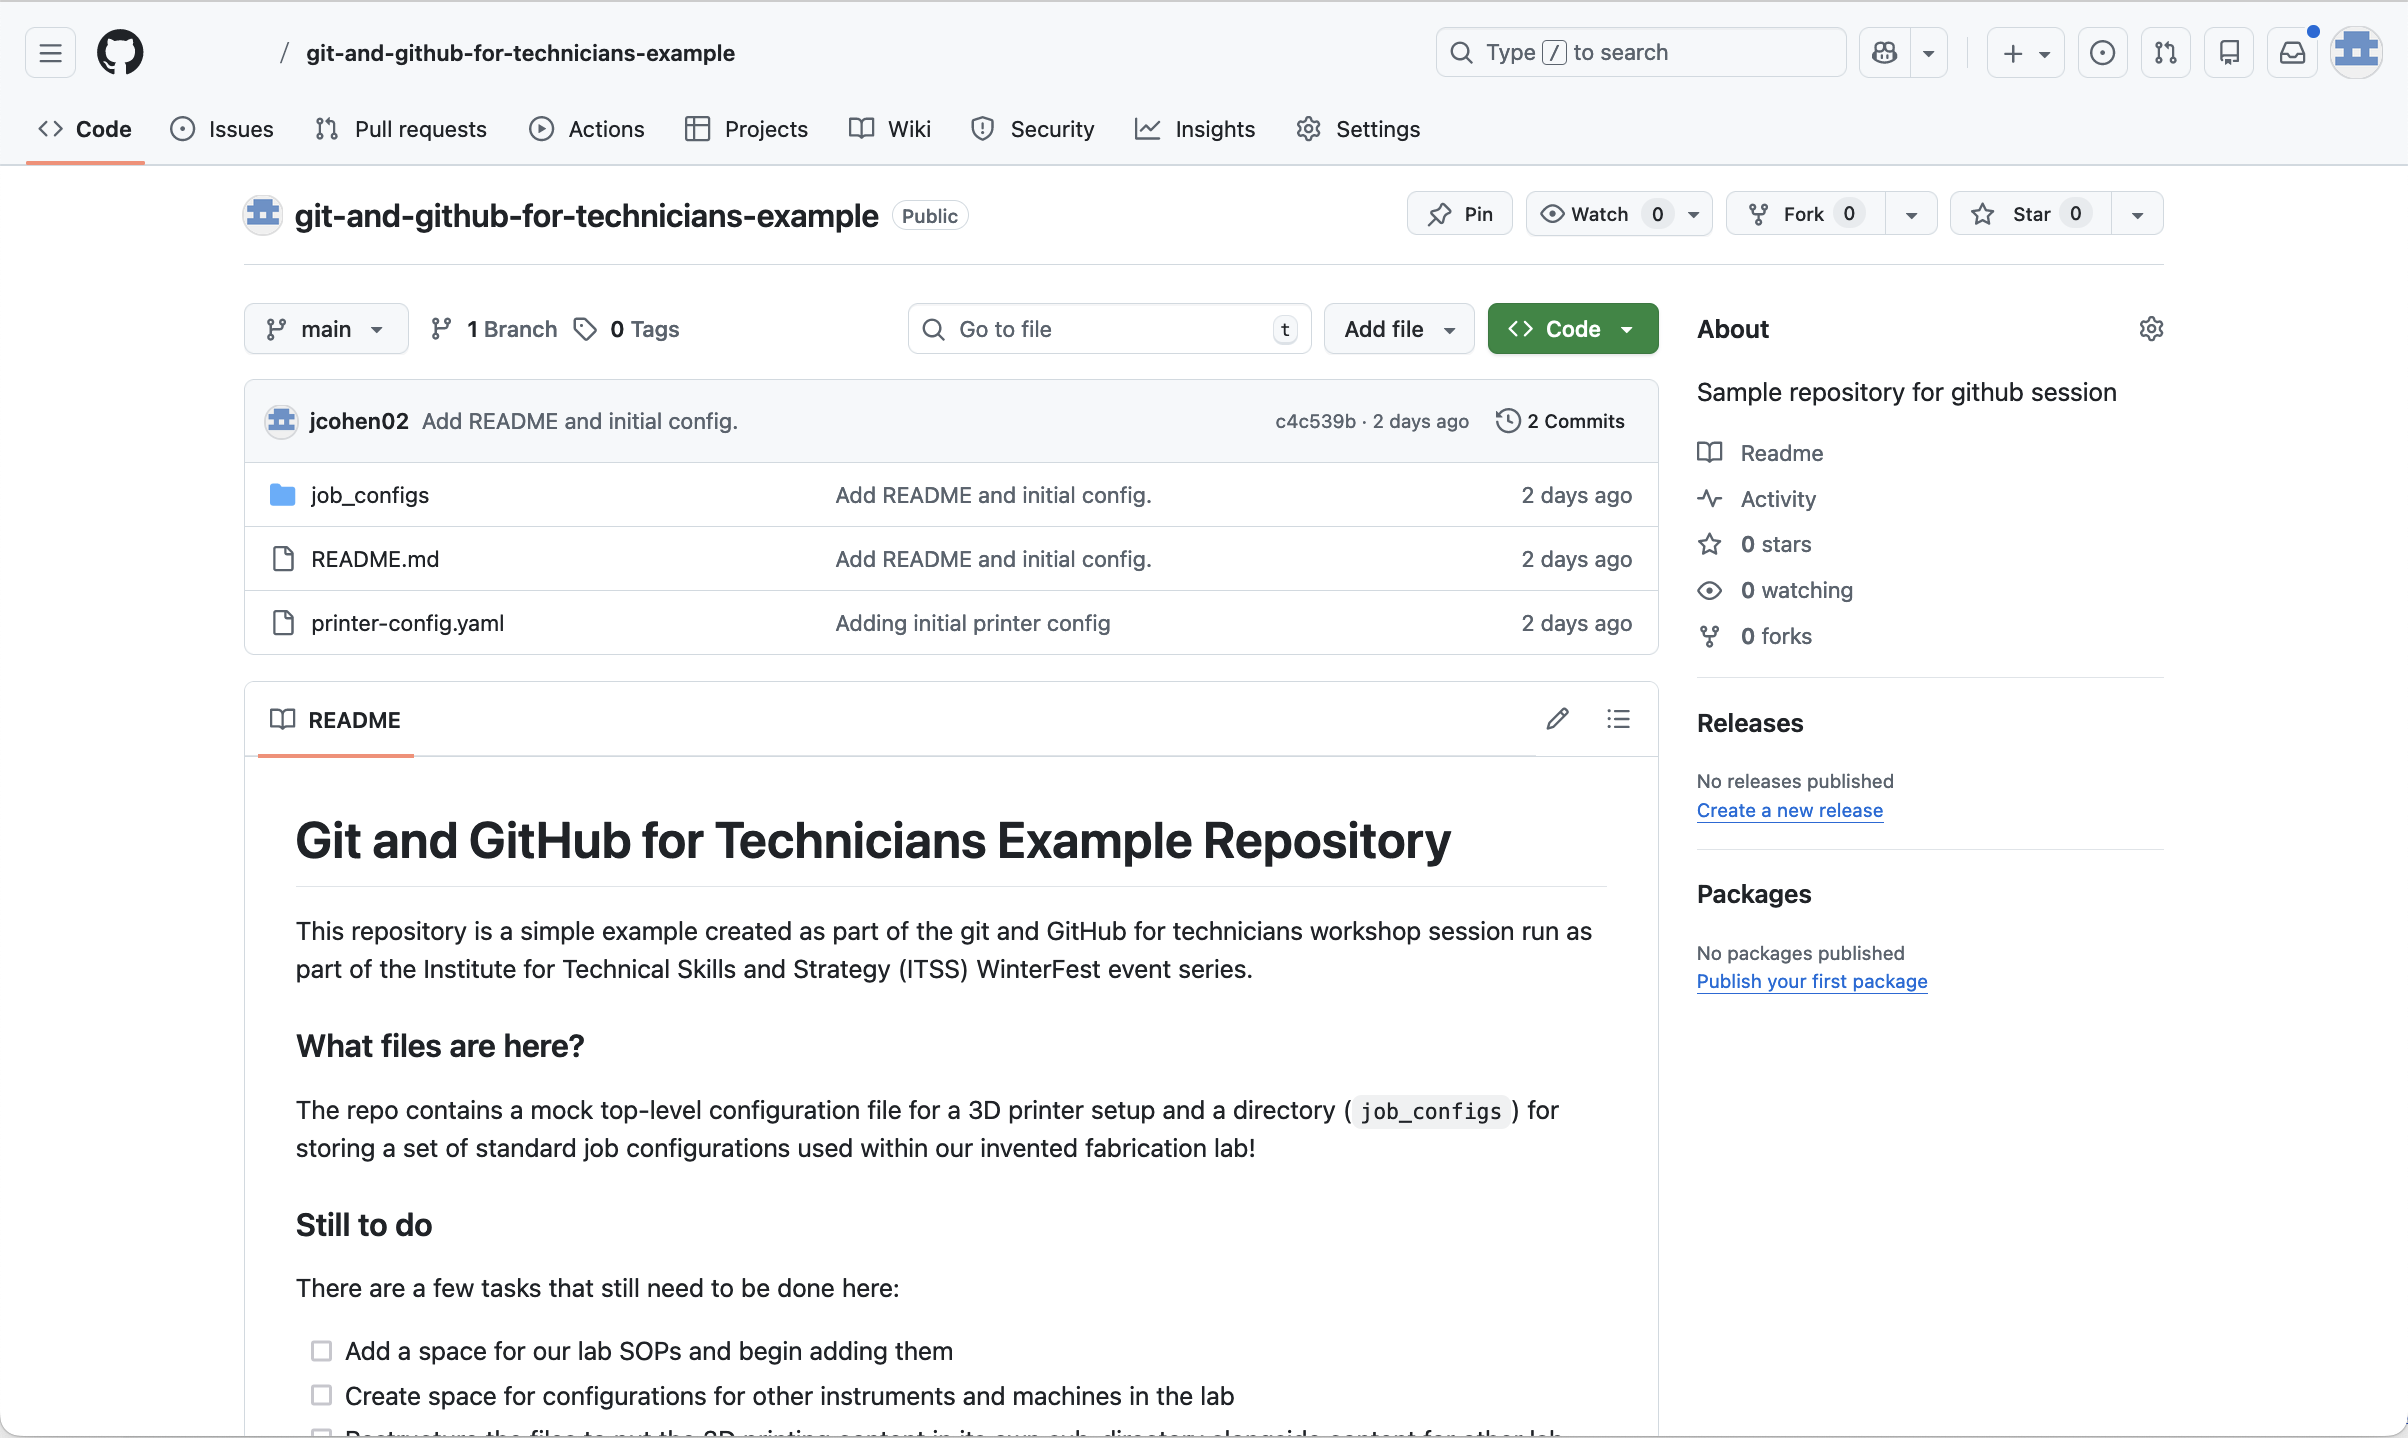
You can look at the commits and also see what has been changed in each one:
Content from Git and GitHub: Where next?
Last updated on 2026-01-20 | Edit this page
Estimated time: 10 minutes
Overview
Questions
- I can create a git repository and push it to GitHub, what next?
- What other things can I do with GitHub.
- Where can I get more help and information?
Objectives
- Highlight some of the other features of git and GitHub.
- Provide some pointers of where to look for further information.
Git and GitHub - where next?
Git and GitHub are very feature-rich tools and there’s far more to learn than the very basic usage we’ve covered in this short session. Indeed it’s possible to use these tools extensively in real-world projects and still be learning new things regularly!
In the next section of this episode, Further training opportunities and resources, there are some links to potentially helpful resources that you might like to follow-up on
Git:
-
Branches: Branches provide a way to work on changes to your repository content on a separate “track” to the main repository content. Branching can be straightforward but it can also lead you towards needing to understand a wide range of complexities in git. Often these are best learnt through experience.
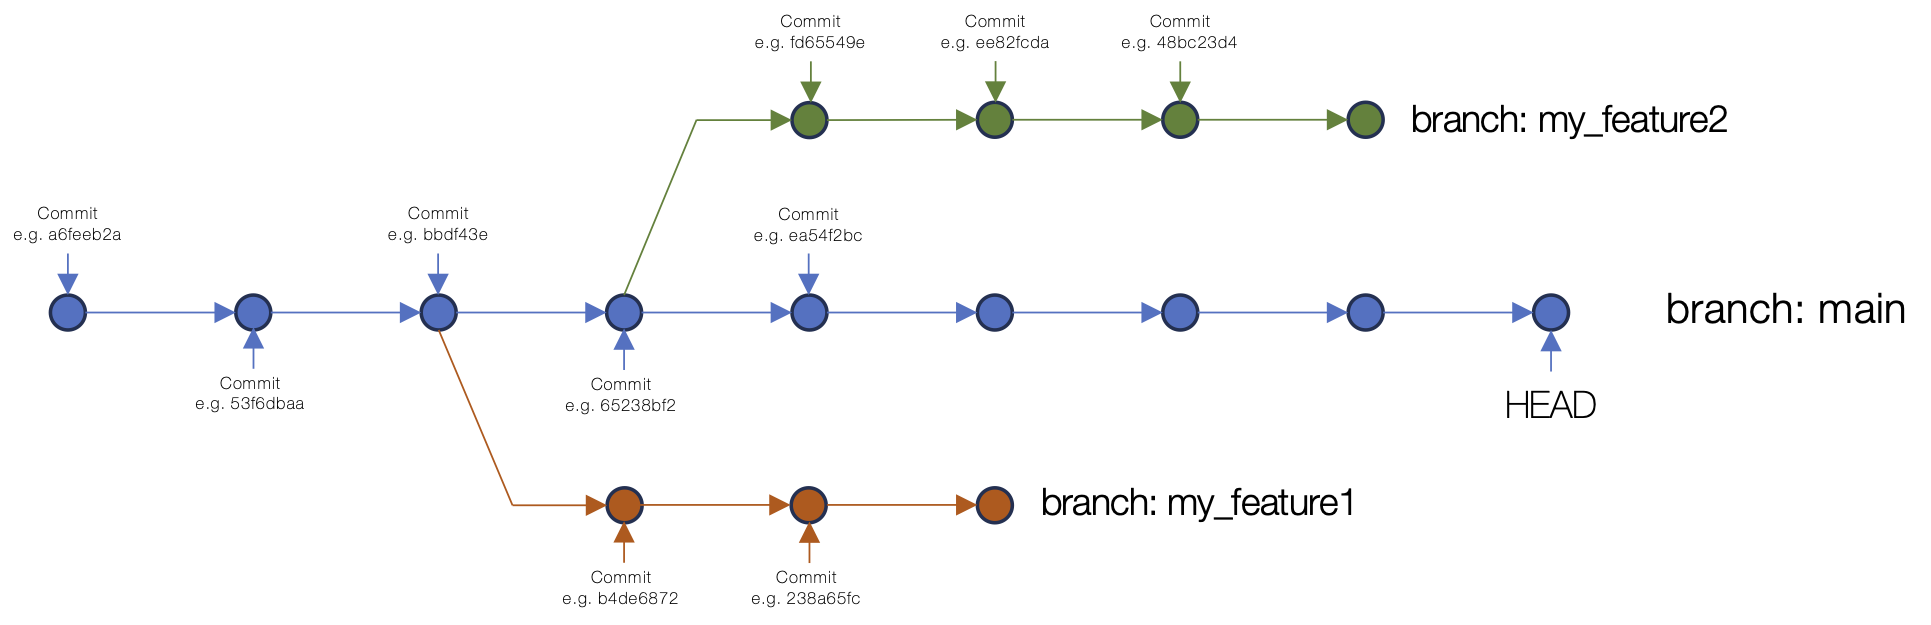 An example of branching in a Git repository commit structure.
 -
Merging: Consider a case where you’re working on the content in your repository in a branch. You want to add some new content to the repository and make changes to existing content and you’d like a bit of time to work on these changes without affecting the main content. Once you’ve completed your updates, you want to bring this updated content onto the main branch of the repository. This is where you’d undertake a merge.
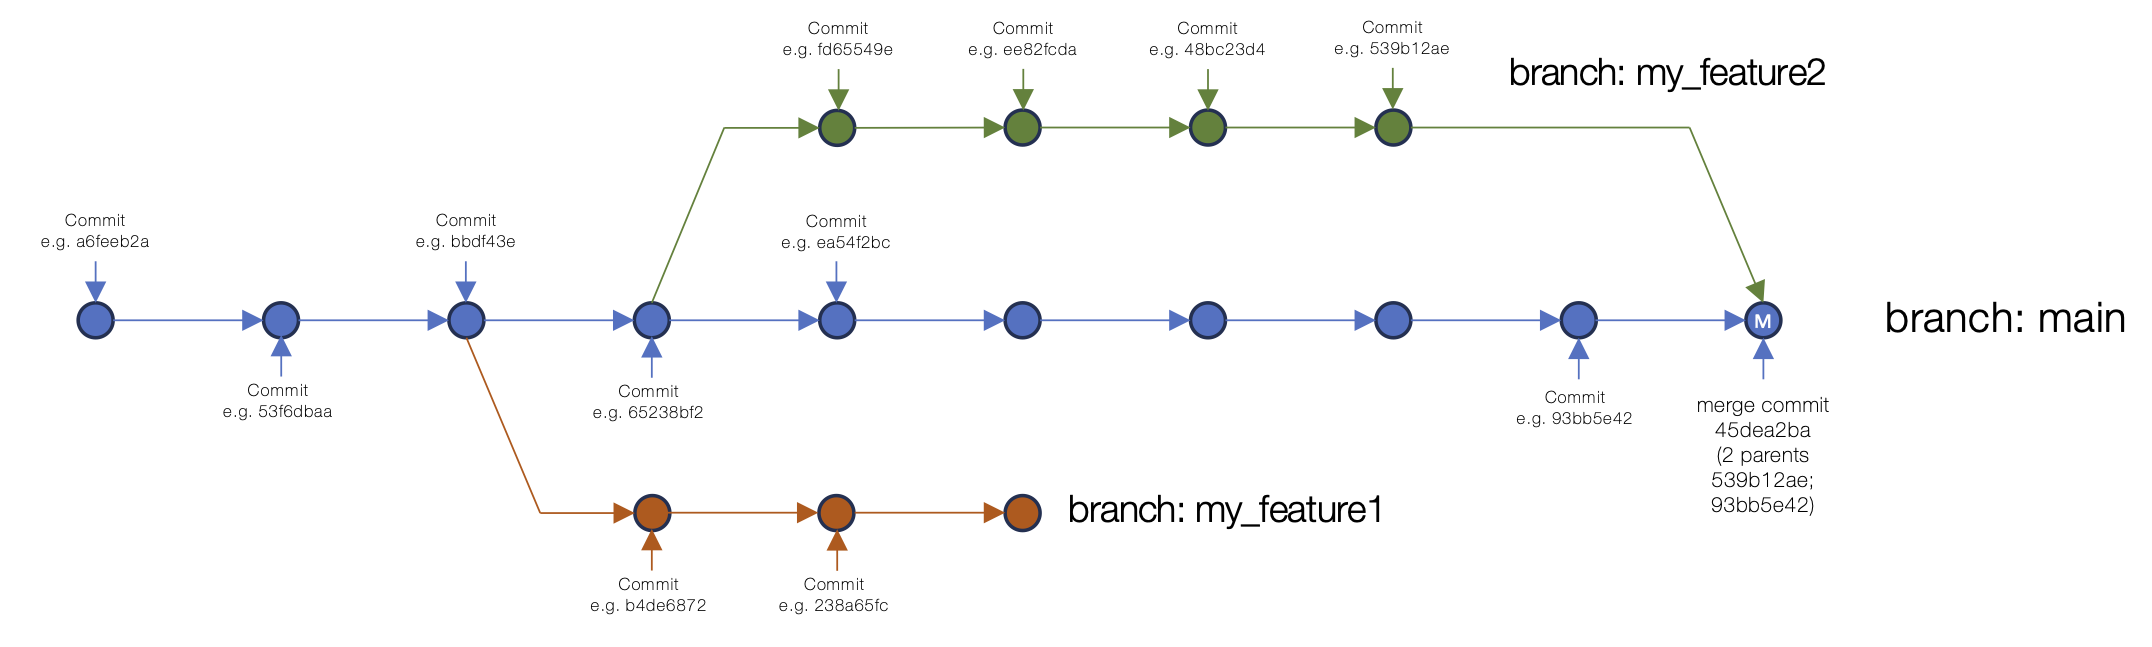 An example of merging a branch into main in a Git repository commit structure.
 Conflicts: Git conflicts occur when you attempt to push a change to a remote repository (i.e. pushing from your local git repository to GitHub) and another change, that you don’t have locally, has been made to the same piece of content on the remote repository. For example, you change the temperature parameter in your 3D printer configuration file, but your colleague has just changed it themselves and pushed that change to the remote repository. When you push to the remote repository, git detects that there’s a conflict. There are a number of common workflows and approaches to avoiding and resolving conflicts. Take a look at the Carpentries git material on conflicts for a nice introductory overview.
Collaborative material development: Git was made for supporting collaborative development. Indeed, it was developed to support the development of the Linux kernel, a huge collaborative community software development project! As with managing conflicts, there are different workflows and best practices followed for using git to manage working collaboratively on code or other text-based content. There’s lots of material online about collaborative code or content development with git.
GitHub:
GitHub adds a number of features on top of git that provide excellent support for collaboration and working with teams (or with unknown contributors) to support the creation and maintenance of code, documentation or other materials. Some of these features are summarised below. See the GitHub documentation for more details. You can also find many tutorials or videos online about how to make best use of these features.
Issues: Issues in GitHub provide a way to highlight and discuss problems, enhancements or requirements as well as supporting other repository content-related discussion. Issues are specific to a given repository and are also often used for managing development, opening issues for functionality to be added or updates that need to be made.
Pull requests: Pull requests sit at the heart of GitHub’s support for collaborative material development. When you create a GitHub repository, even if it’s publicly visible, it will not allow anyone other than you to commit to the repository. You can choose to add collaborators to your repository and give them permission to commit. However, in order to protect the main version of the content (generally in the
mainbranch), rules will often be in place to prevent committing directly to the main branch. Instead, contributors will be expected to make their contributions in a branch and then open a request for their changes to be merged into the main branch. They will open a pull request for this. In a collaborative project, someone would then generally be expected to review the proposed contibution(s) and potentially enter a discussion with the contributor about any suggested/required modifications or changes to their contribution, before ultimately accepting this into the main content.Forks: A fork is used in an extension of the above scenario. If a repository on GitHub is public (or it’s private but someone is given read-only access), and that individual wants to contribute to the repository content, they can’t create a branch in the main repository from which to open a pull request. Instead they create a “fork” of the repository, a copy of the git repository within GitHub, under their own user account, or an organisation that are part of. They then have full read and write access to this fork of the repository. They can make changes within their fork and then open a pull request, as explained above, requesting to contribute content into the main project repository. An owner/maintainer of that repository can then choose to accept the conrtibution into the main repository once any requested changes have been made.
GitHub actions: If you’re using GitHub for developing software, GitHub Actions provides an advanced environment for running a number of automated tasks on the code in your repository. Actions is now very advanced and offers a huge range of capabilities, including via third-party “actions”. Especially common uses of GitHub Actions are for running automated tests on code and for packaging and releasing code to package repositories. Actions can run processes on a range of different operating systems and OS versions meaning that, for example, a set of automated code tests can be run across a range of different operating systems (e.g. Windows, Linux and macOS), each time so specific trigger occurs. This trigger might be the pushing of new content to a repository from a remote repository, or the creation of a pull request or a release within GitHub. This can be used to ensure that each time code is changed, it still functions as expected across a number of different platforms.
Projects: GitHub now includes extensive functionality for project management tasks via GitHub Projects. A range of different views of project tasks can be provided and these can be linked to repository issues to offer a direct connection to discussion and code or other content added to a repository to address specific task items.
Wiki: Repositories can have a wiki (if this option is enabled) which provides a space for editable information pages that sit alongside the repository. There are range of different use cases for GitHub wikis. The inclusion of this functionality avoids having to work with a separate external wiki platform if one is required.
GitHub Pages: GitHub Pages provides free web hosting for static web content developed within GitHub repositories. The basic Pages infrastructure is based on the Jekyll static site generator which can be used to support the display of Markdown-based content in a templated stated web page environment. Pages also offers support for hosting static web content generated through other means by using GitHub Actions to build the pages and placing the generated content in repository location (e.g. a separate branch) from where Pages hosts the content.
Further training opportunities and resources
There are various resources available from documentation to training courses (both taught and self-paced) that can help you to develop your git and GitHub knowledge. Here are few options:
Online documentation, info and other materials:
Git introductory videos: A great way to get a slightly different (and more detailed) perspective on the background of git, what version control is and how it can help you.
The git book (Pro Git): Available online under a Creative Commons Attribution Non Commercial Share Alike licence. A detailed reference to git from the basics through to much more advanced topics, and some content on using GitHub.
GitHub Docs: GitHub’s detailed documentation website.
GitHub Blog: Regular articles covering GitHub, platform features and related software development topics.
Training courses:
Version Control with Git course (Software Carpentry): This is The Carpentries introductory git course covering the basics of Git and GitHub in 3+ hours of material. This can be covered as a self-learning course or through attending a taught Software Carpentry course which also includes an introduction to the bash shell and a programming language (either Python or R).
CodeRefinery’s introduction to version control course: This is taught as a 2-day course but material can also be easily worked through online.
CodeRefinery’s Collaborative distributed version control course: This course adds another day of more advanced material on top of the introductory course mentioned above.
Software Development Using Git and GitHub: An episode of the Intermediate Research Software Development course within the Carpentries Incubator.